- Editor's Choice: Best Back-to-School Tech Gifts
- Get These 12 Student Discounts!

How to Make a Flyer with Microsoft Word
Advertise what you’re selling or sharing
:max_bytes(150000):strip_icc():format(webp)/KarenMarcus-b36dca4c46e7441c8a50744f9a5c0260.jpg "microsoft word flyer assignment")
- University of Colorado at Denver
- Colorado State University
:max_bytes(150000):strip_icc():format(webp)/WorkBadgePhoto-61c0b98ef5a74e4a85851a8f706dbd65.jpg "microsoft word flyer assignment")
What To Know
- In Windows: File > New > Flyers . Pick a template, and press Create . Right-click a picture, and press Change Picture . Right-click to edit.
- On a Mac: In New Document, search for "Flyers." Pick a template, and press Create . Edit the flyer, and save or print.
This article explains how to use templates in Microsoft Word to create flyers. These instructions apply to Word 2019, 2016, Word for Microsoft 365, and Word for Mac .
How to Create a Flyer in Microsoft Word Using Templates
Word offers a variety of ready-made templates to help you customize a flyer. Here's how to get these templates:
In Word, go to the File tab and select New .
Under the search bar, select Flyers .
Browse through the free flyer templates Word displays until you find a design you like.
Choose Create .
If you can't find a template you like, download one from Microsoft.
To change the text, select it and type the new information.
To change the image, right-click the existing one, then select Change Picture . In the Insert Pictures dialog box, select From a file . Browse to an image on your computer then select Insert .
To change the color or another design feature of a content box, right-click the box and choose the appropriate menu items to alter the element. To delete an unwanted element, select it and press Delete on the keyboard.
Save the flyer, then print it or send it in an email message.
Saving the changes to a document doesn't change the template. When you open the template again to start a new flyer, it appears the same as when you first opened it.
Create a Flyer in Word for Mac
Creating a flyer in Word for Mac is easy with the templates Microsoft provides.
These instructions are for Word for Mac 2011 but are similar for newer versions, as well.
From the New Document screen, type flyers into the search bar.
Alternatively, select New from Template from the File menu or press Shift+Command+P on your keyboard.
Browse the templates until you find one you like.
Select the template you want, then select Create .
Add your text over the placeholder text.
If you don't need a placeholder text box, select it and press Delete on the keyboard.
Adjust the text color and size the same as in any Word document.
When the flyer is complete, print it, or (depending on what you want to do with it later) save it to the hard drive, the cloud, or a flash drive.
Select the Insert tab > the small down arrow next to the Text tool > Draw Text Box . Draw the text box, then open the Text Box Tools tab and enter the text box dimensions you want. Select Shape Outline > Dashes , then enter the information you want in the tearaway sections and copy/paste the box to the location you prefer.
Open the flyer document you want to edit, then select the Layout tab > Margins > Custom Margins > Pages . Then, open the Multiple Pages dropdown and select 2 pages per sheet .
Open the flyer document in Word and select File > Print . In the print window, select Properties , then open the Pages per Sheet dropdown and select 4 pages . Select OK to save your settings, then start printing to produce four fliers per page.
Get the Latest Tech News Delivered Every Day
- How to Make a Brochure in Microsoft Word
- How to Insert a Table of Contents in Microsoft Word
- How to Find Microsoft Word Templates Online
- How to Clear Formatting in Word
- How to Add and Remove a Border From a Word Document
- How to Make Flashcards on Word
- How to Rotate Text in Word
- How to Vertically Align Text in Microsoft Word
- How to Create a Hanging Indent in Word
- How to Create a Microsoft Word Flowchart
- What Is Microsoft Word?
- How to Fix Spacing in Word
- How to Fix It When Spell Check Is Not Working in Word
- How to Organize Word Documents With Tags
- How to Create and Use Microsoft Word Templates
- How to Do Subscript in Word
How to Create a Flyer in Microsoft Word
Paper the town about your band's gig
Even with all the technology today, people still use physical flyers. We see them everywhere. From garage sale signs taped to poles to event flyers on the campus bulletin board, flyers are a great way to get the word out.
You can use a tool like Canva , but Microsoft Word is a solid application for making flyers. You can find plenty of templates, so you never have to start from scratch. Here, we’ll walk you through creating a flyer in Word and include some helpful tips for making your flyer awesome!

Microsoft Office Flyer Templates for Word
When it comes to templates for Microsoft Word, going to the source is the best option. You can find templates to create your flyer in the Word desktop app or Word on the web.
Find a Template in Word Desktop
If you use the Word desktop application, an excellent place to start is by searching the in-app template options.
- Open Microsoft Word, confirm you’re on the Home tab to the left, and pick More templates on the right.

- Below the Search box, you should see the Flyers category. Select this to browse all available flyer templates. Alternatively, you can enter a specific type of flyer into the Search bar like “Sale Flyer” or “Event Flyer.”

- Choose a flyer that interests you to see more detail and select Create to use it.

Find a Template in Word for the Web
One of the easiest ways to find and use a flyer in Word for the web is to head to the Office Templates website.
Scroll below the Popular Categories section and select See all categories , then choose Flyers . Alternatively, you can enter a specific type in the Search bar at the top.

When you see the template you want, make sure it’s available for Word. Then, select it and choose Open in browser . If you only see the Download option, then the template is only available as a download for the Word desktop application.

This opens the flyer template in Word for the web, ready for you to customize.
Third-Party Flyer Templates for Word
If you don’t see anything you like from Microsoft, you can check out a couple of third-party options. When you find a free flyer template you want, you’ll simply download it and open it in Word.
Vertex42 Templates
Vertex42 is an excellent option for free Word templates. When you land on the main page, select Flyers on the right within the Browse Template Categories box.

You can then browse through the templates or choose a category on the right in the Flyer Templates box.

You’ll see options for real estate, party, event, tear-offs, and more.
Template.net Templates
Another good choice for free Word flyer templates is Template.net . You should see the Flyers category right below the Search box on the main page. You can also select the category by going to Templates at the top and looking beneath the Marketing materials.

On the Flyer Templates page, you can look through the options or choose a subcategory.
Select a template you want to see the details. Then, use the Select File Format & Download drop-down box to choose Word and hit Download Now .

Note that not all flyer designs are free, which you’ll see before downloading one.
Common Flyers for Word
Now that you know the quickest and easiest way to create flyers in Word is by using a template let’s take a look at a handful of options!
Garage Sale Flyer
Microsoft has a neat and clean Garage Sale Flyer template. It has the word “Garage Sale” and spots for the date and time nice and big at the top, making it ideal for posting most anywhere.

Each header is collapsible. So if you decide not to include all of the details shown, simply collapse that section. To enter your details, select the text and add your own.
Tip : Take advantage of the Directions section so that potential customers can find your location easily.
Tear-Off Flyer
Tear-off flyers are popular for services and sales because they provide your contact information in strips that people can tear and take. Like this Item for Sale template, they have spots for your name, website, phone number, and email address or certain combinations.

Select each text box to add your information to the main part of the flyer. At the bottom, enter your contact details in tear-off strips.
Tip : Some flyers may populate the strips automatically when you complete one. If not, you can finish one strip and then copy and paste the text to the others.
Event Flyer
Maybe your local business is having a grand opening celebration, or your organization is holding a fundraiser. You can let everyone know with this ZigZag Event Flyer suitable for all occasions.

Simply select each box to swap the placeholder text with your event details. You can also experiment with different colored fonts if you find these too bright.
Tip : The template websites above have many themed event flyers for holidays, graduations, seasons, sporting events, etc.
Retail Sale Flyer
Whether your store is offering a big sale or your restaurant is offering discounts, get the word out with this Retail Sale Flyer .
This one has handy spots specifically for your discounts or sale items. Like the other templates, you just replace the sample text on the flyer with your own. Plus, this template has a place designated for your logo, which is a great way to brand your business.

Be sure to fill out the “prices good through” date and include your regular business hours.
Tip : Use the space at the bottom for important details like directions or disclosures about the sale or discounts.
Reward Flyer
If you’ve ever lost something valuable to you, you know how badly you want it back. Whether an item or even a family pet, you can provide a photo, details, and amount with this Reward Flyer .

This template has the text placed in the ideal spots to grab viewers’ attention. Select a text box and type in your details. To replace the photo with your own, delete the existing one. Then head to the Insert tab and use the Pictures drop-down menu to locate and use yours.
Tip : Be sure to include a photo that displays your lost item. You can also resize the picture, so it fits nicely in the flyer.
Tips for Making a Flyer in Word
With each of the above flyer templates, we included helpful tips, but here are a few more for making the best flyer.
- Consider adding a QR code to your flyer for your location’s website. Those who see your flyer can scan the code with their mobile device .
- Be sure to double-check the details on your flyer, especially prices, phone numbers, and address.
- Use a paper coating if you plan to post your flyer outdoors or in an area where it could become wet or weathered.
For more, take a look at how to create greeting cards, set up labels , or make a booklet , all in a Microsoft Word document.

Sandy Writtenhouse is a freelance technology writer and former Project, Department, and Program Manager. She turned her education, job experience, and love of technology into a full-time writing career. With all sorts of gadgets in her home and her hands, she seeks to help others make life easier through technology. Read Sandy's Full Bio
Read More Posts:
Leave a Reply
Your email address will not be published. Required fields are marked *
How to Make a Flyer on Word 2019: A Step-by-Step Guide
Creating a flyer on Word 2019 can be a breeze with the right guidance. All you need is a computer with Microsoft Word and some creativity. After reading this article, you will know how to design and customize a flyer that will catch the eye of your audience.
Step by Step Tutorial on How to Make a Flyer on Word 2019
Before you dive into making your flyer, it’s important to have a clear concept of what you want your flyer to look like. Think about the purpose of your flyer, the audience you’re targeting, and the message you want to convey. With that in mind, let’s get started!
Step 1: Open Microsoft Word
Open Microsoft Word on your computer and create a new blank document.
Starting with a blank document allows you to have a clean slate to design your flyer. This step is straightforward; just double-click on the Word icon on your desktop or search for it in your computer’s programs.
Step 2: Choose a Flyer Template
Go to the ‘File’ tab, click on ‘New’, and type ‘Flyers’ into the search bar. Select a template that suits your needs.
Word 2019 has a variety of templates that can give you a head start on designing your flyer. These templates are pre-designed with various themes and layouts, so you can choose one that aligns with the vibe of your event or advertisement.
Step 3: Customize Your Flyer
Customize the template by adding your own text, images, and design elements.
This is where you can let your creativity shine. Change the font styles, add your own pictures, and tweak the layout to make it your own. Remember to keep your audience in mind and make sure the information is clear and easy to read.
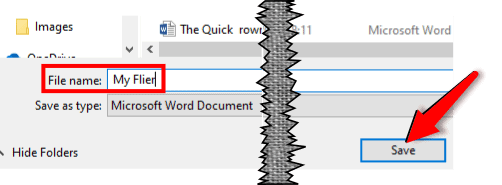
Step 4: Save Your Flyer
Once you’re happy with your design, save your flyer by going to the ‘File’ tab and clicking ‘Save As’. Choose where to save it and what to name it.
It’s essential to save your flyer so you won’t lose all your hard work. Plus, you’ll want to be able to print it out or share it digitally with others.
After completing these steps, you’ll have a unique flyer ready to distribute. Whether you print it out or share it online, your flyer will be sure to get the word out about your event or promotion.
Tips for Making a Flyer on Word 2019
- Keep your design simple and uncluttered. Less is often more when it comes to flyer design.
- Use high-quality images to make your flyer more appealing.
- Make sure your text is easy to read by choosing clear fonts and appropriate sizes.
- Stick to a color scheme that reflects the mood of your event or promotion.
- Don’t forget to proofread your flyer before printing or sharing it.
Frequently Asked Questions
Can i use my own photos in the flyer.
Yes, you can add your own images by inserting them into the document. Just make sure they are high-quality and relevant to your flyer’s content.
How do I print my flyer?
Go to the ‘File’ tab, select ‘Print’, and choose the appropriate settings for your printer. Make sure to do a print preview to check that everything looks good.
Can I share my flyer online?
Certainly! Save your flyer as a PDF by going to ‘File’, then ‘Save As’, and selecting PDF from the dropdown menu. This format is perfect for online sharing.
What if I don’t like any of the templates?
You can always start from scratch with a blank document and design your flyer without a template. This gives you complete creative freedom.
Are there any size restrictions for flyers in Word 2019?
Not really. However, typical flyer sizes range from 4″x6″ to 8.5″x11″. You can set your page size by going to ‘Layout’, then ‘Size’, and selecting or customizing the dimensions you want.
- Open Microsoft Word
- Choose a flyer template
- Customize your flyer
- Save your flyer
Making a flyer on Word 2019 is a skill that can come in handy for various occasions. Whether you’re promoting a garage sale, announcing a community event, or advertising a new business, flyers are a tried-and-true method for getting the word out. With the easy-to-use templates in Word 2019, along with your own custom touches, you can create a flyer that’s both eye-catching and informative. Remember, the key to a successful flyer is a clear message, a visually pleasing design, and all the essential details your audience needs. Now that you’ve learned how to make a flyer on Word 2019, it’s time to put your new skills to the test. Get creative and make a flyer that’ll have everyone talking!

Matthew Burleigh has been writing tech tutorials since 2008. His writing has appeared on dozens of different websites and been read over 50 million times.
After receiving his Bachelor’s and Master’s degrees in Computer Science he spent several years working in IT management for small businesses. However, he now works full time writing content online and creating websites.
His main writing topics include iPhones, Microsoft Office, Google Apps, Android, and Photoshop, but he has also written about many other tech topics as well.
Read his full bio here.
Share this:
Join our free newsletter.
Featured guides and deals
You may opt out at any time. Read our Privacy Policy
Related posts:
- How to Make a Flyer on Google Docs: A Step-by-Step Guide
- Crafting Flyers with MS Word Templates: A Step-by-Step Guide
- How to Print Avery Labels in Word
- How to Save Label Templates on Microsoft Office Word: A Step-by-Step Guide
- How to Make All Columns the Same Width in Excel 2013
- How to Remove Section Breaks in Word Documents
- How to Find a Template in Word 2007: A Step-by-Step Guide
- How to Create an Event on Facebook Business Page: A Step-by-Step Guide
- How to Edit a Template in MS Word: A Step-by-Step Guide
- How to Make a Facebook Event: A Step-by-Step Guide for Beginners
- How to Return to Normal View in Word 2010
- How to Use MS Word Templates: A Step-by-Step Guide
- How to Print from Microsoft Word for Office 365: A Step-by-Step Guide
- How to Cancel a Meeting in Google Calendar
- How to Print from Google Docs on iPhone or Android
- How to Clear the Print Area in Excel 2010
- How to Create a New Business Card Template in Word: Step-by-Step Guide
- How to Restore MS Office Normal Template: A Step-by-Step Guide
- How to Delete a Calendar Event on iPhone 14: A Step-by-Step Guide
- How to Use a Book Template for Word 2019: A Step-by-Step Guide
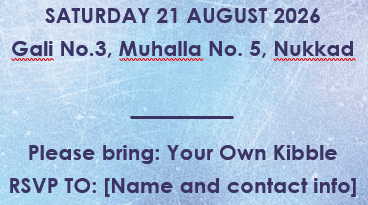
MICROSOFT WORD - Creating a Flyer Assignment

Also included in
Description
Will work with Microsoft Word 2010 & 2013 & 2016
This is a GREAT step by step assignment for students to practice and demonstrate their skills with using Clip Art, Photos, & Tables! They create a Flyer over a clothing brand of their choice, however you can always change what they make the flyer over. This assignment let's the students be creative and have fun!
Included is the Assignment, a Rubric, and two examples of a Completed Flyer(Answer Key).
Students love creating these flyers!
************************************************************************************************
Click here to view our other TPT products
Click here to view our website & sign up for FREEBIES via email
Follow us on Instagram for our newest updates!
Follow us on Pinterest
Follow us on Twitter
Terms of Use:
Created by Tech Twins, LLC ©
Purchase of this product is for single classroom use by the purchaser only. It is a violation for individuals, schools, and districts to redistribute, edit, sell, or post this item on the internet or to other individuals. Additional licenses are available for purchase.
Product names, logos, brands, and other trademarks featured or referred to within this lesson are the property of their respective trademark holders.These trademark holders are not affiliated with Tech Twins, LLC. They do not sponsor or endorse the contents, materials or processes discussed within this lesson.
Thanks for visiting our store! If you decide to make a purchase, please do not forget to leave feedback. We love to hear your thoughts on our products!
Also, don't forget to "FOLLOW" us for exciting new product announcements, sales, promotions and updates!
The Tech Twins
Questions & Answers
- We're hiring
- Help & FAQ
- Privacy policy
- Student privacy
- Terms of service
- Tell us what you think
How to Make a Flyer in Word (Using a Quick Template)
Everyone has to make a flyer at some point. It’s easy in Microsoft Word with a quick template that you can download, replace content, and use. You’re probably already familiar with MS Word, so why not use that as a jumping off point for a simple flyer project?
Here, we’ll take you through everything you need to know to create a flyer from a professional template, from thinking about content to preparing the file for printing.
We’re going to use a template from Envato Elements (where there are loads of great options!), but you could use any flyer template for Word that you’ve tracked down online.
19+ Million Flyer Designs & Templates, Print Templates & Mockups With Unlimited Downloads
Download thousands of beautiful flyer templates, flyer mockups, and stunning print templates with an Envato membership. It starts at $16 per month, and gives you unlimited access to a growing library of over 19+ million design assets, themes, photos, graphics, and more.

Flash Sale Flyer

Legal Flyer Template

Yoga Flyer Template

Corporate Flyer Template

Real Estate Flyer

Sale Flyer Template
See More Flyer Templates
Gather Materials, Including Text and Images
The first step in creating a quick flyer design is to have all your materials in hand.
You may have some or all of the items in this list for your flyer design:
- Text elements
- Photos or illustrations
- Brand or event logos
- Color or font palette
- Links or QR codes
- Sponsor information
Then it is time to think about the design of your flyer. Since you are planning to make it in Microsoft Word, chances are you are using a common size such as A4 or 8.5 inches by 11 inches.
Then you can figure out what elements the template needs to accommodate your flyer content. Knowing this information from the start can save time because the template you choose will be more likely to work with the materials you have.
- Does it need to accommodate photos or a lot of text?
- Is there a certain mood or theme the flyer should convey?
- Does it need to have a high-visual presence because you are short on assets?
Search for a Template

The next step is the fun part. Search for a template that resonates with your visual style. Remember that colors can often be changed, so look for a template that you like the structure of.
Not sure where to start your flyer quick template search? Envato Elements is packed with thousands of templates in all styles.
Once you find a template that meets all of your needs, download the file and get started. Note that you might need to download fonts as well. Check the template notes and documentation for information on where to find free fonts that might be used in the Microsoft Word flyer template design.
Adjust the Template for Size and Bleed

Many flyer templates will download with multiple options and formats, including different sizes or software used to create the design.
Make sure you are working with the right size and then open the design that uses Microsoft Word.
If you downloaded a template in a different size than what you need (maybe A4 versus letter), adjust the document size before you get started.
Customize Flyer Template Elements

Once you have the size specifications in order, it’s time to really make the flyer template design your own in Microsoft Word.
Save the template as a new file first. That way you can always refer back to the original if needed.
Then substitute brand elements, such as the font or color palette.
Strip out template elements that you don’t need, such as text boxes or design elements. When working with a quick template, you’ll probably use all the design elements and text fields. (That’s why you chose this design!)
Insert your text and images to turn the template into a customized Microsoft Word flyer.
Don’t forget to check — and double-check — key elements in the design:
- Brad colors
- Spelling and grammar
- Replace photos with your own
- Contact information
Print or PDF the Flyer for Distribution

Once the design is set and edited, you need to prepare the file for printing or as a PDF for digital distribution.
For printed flyers, options include printing the flyer yourself, using a local print shop, or uploading the file to an online printer and having the final flyers shipped to you.
You can also share the flyer via digital publication. You might use the flyer design by posting it online or on social media, providing others with a downloadable PDF, or publishing it as part of an email campaign. For these methods of distribution, you’ll likely want to create a PDF or JPG file (or both).
The one commonality is that all of these options require you to prep the final file for the publication and distribution method that you intend to use.
To print or create a PDF, navigate to File, then Print and select the printer settings for where you are printing. This might include color settings, two-sided flyer printing, and the number of copies. From here you can also “print” or save it as a PDF.
To save your flyer created in Microsoft Word as a JPG or PNG image, you’ll need to take a screenshot of the image. Make sure to get the whole flyer on the screen at once and use a screengrab tool (or CMD + 4 on a Mac) to take a picture of the flyer. To ensure a clean screenshot, make sure no items in the document are selected or you will see those outlines.
Creating a flyer in Microsoft Word can be quick and easy. If you need to get started and finished in a hurry or are struggling with design inspiration, a template is a way to go. Your project will move most quickly if you choose a template that’s of you linking and matches your content in hand, so you can subsite elements without having to rethink the design.
Need a little flyer design or template inspiration? You can find it here .

Try Process AI free
How to make a flyer on microsoft word.
Making a flyer with Microsoft Word is a great way to create attractive promotional materials. We’ll guide you through the process of making a flyer. Pick the right template, customize the design, and make an eye-catching flyer!
Open Microsoft Word , then select “New Document.” Click on “Templates” and choose a flyer that fits your needs. Browse categories such as events, promotions, or business.
Once you’ve chosen a template, start customizing it. Microsoft Word has easy-to-use tools for editing text, adding images & shapes, and changing colors. Add your own text and adjust font styles & sizes.
Insert pictures from your computer or pick from the clipart in Microsoft Word . Select high-quality images that relate to your message and look good.
Arrange elements like text boxes, images, and shapes nicely. Use alignment guides to make sure everything is in the right spot.
Before you finish, proofread your flyer for any errors. A great design with no mistakes will make a good impression.
Creating a professional-looking flyer with Microsoft Word is easy. Just follow these steps and use the tools provided by Microsoft Word . Design a great promotional material for any purpose!
Getting Started with Microsoft Word
To get started with Microsoft Word for creating a flyer, open the program and set up the document. Opening Microsoft Word is the first step towards designing your flyer, followed by setting up the document according to your desired specifications.
Opening Microsoft Word
- Tap the Windows Start menu icon.
- Type “ Microsoft Word ” in the search bar.
- Click the Microsoft Word application icon that comes up in the search results.
- Or, if you have a shortcut on your desktop, double-click it.
- Wait a few seconds for Microsoft Word to open and load.
- You’re now ready to make professional documents!
Learn the features of Microsoft Word – such as formatting, templates, and collaboration tools. You can also boost your performance with keyboard shortcuts and helpful tips online.
Did you know that Microsoft Word first came out in October 1983? It has changed a lot since then and has become invaluable for individuals and businesses. Microsoft Word has gone from small beginnings to world-wide success – it’s still revolutionizing the way we make and manage documents.
Setting Up the Document
Want a well-structured, visually appealing document? Follow these 6 simple steps:
- Open Microsoft Word and pick the ‘Blank Document’ option.
- Pick the page orientation, either ‘Portrait’ or ‘Landscape’.
- Set the margins by going to ‘Page Layout’ and ‘Margins’. You can use predefined options or customize your own.
- Select font style, size, and color for the text. Highlighting it and using the formatting options in the toolbar.
- Add headers and footers in ‘Insert’ tab. You can customize with text, page numbers, dates, and more.
- Save the document by clicking the floppy disk icon or press Ctrl + S.
Also, adjust line spacing, apply styles, insert tables/images, add page breaks for readability. That is how you create a professional-looking document! So start setting up your next Microsoft Word doc and show off your creativity!
Adding and Formatting Text
To add and format text with ease in Microsoft Word, follow these steps for the ‘Adding and Formatting Text’ section. Begin by selecting a Font and Font Size that suits your flyer. Then, explore formatting options like Bold, Italic, and Underline to enhance the visual appeal.
Choosing a Font and Font Size
Font and font size play an important role in creating a captivating and visually pleasing document. Let’s explore some key considerations when selecting fonts and sizes.
- Font style: For formal documents, choose clear and professional fonts like Arial or Times New Roman . For creative or informal projects, opt for fonts like Calibri or Helvetica . But, never forget, readability should always be the priority.
- Font size: To make text legible and easy to read, use 12pt – 14pt for standard paragraph text. For headings or titles, larger font sizes are necessary to maintain hierarchy within your document.
- Consistency: Consistency in font styles and sizes will ensure your document appears cohesive. Use complementary fonts and consistent sizing for all headings, subheadings, body text, and captions.
- Compatibility: When creating digital content, consider cross-platform compatibility. Use widely available fonts so your text appears correctly on different devices and platforms.
Include bold or italic formatting for emphasis or hierarchy within your text. This will draw attention to important information or differentiate between headings.
Remember, the font and font size should match the purpose and target audience of your document. Plus, they should maintain professionalism and readability. Select these elements thoughtfully for engaging content.
Formatting Text Styles (Bold, Italic, Underline)
When formatting text styles, like bold, italic, and underline , keep these points in mind:
- Bold: Emphasize important words or phrases with bold. It makes the text stand out, and gives it a sense of importance.
- Italic: Italic text is often used for emphasis too, but differently than bold. It gives text a more elegant or stylish look, like titles or quotes.
- Underline: Traditionally used to indicate hyperlinks or draw attention to words. But, today, avoid underlining as it may be mistaken for a link.
- Combining Styles: Don’t overdo it with multiple styles. Too many bold, italic, or underlined words can be hard to read.
- Consistency is Key: Stick to one style guide for headings, titles, etc.
Furthermore, when considering formatting text styles:
- Don’t mix font sizes and colors.
- Use clear language and structured sentences, not just formatting styles.
- Make sure visually impaired individuals can understand the content. Provide alternative descriptions for any formatted text.
Follow these suggestions to effectively enhance the presentation and readability of your text.
Inserting Images and Graphics
To enhance your flyer-making skills using Microsoft Word, dive into the section on “Inserting Images and Graphics.” Discover how to create captivating visuals by discovering and adding images, and learn the techniques for adjusting image size and placement. These sub-sections hold the solution for adding eye-catching visuals to your flyer effortlessly.
Finding and Adding Images
Looking for images to add to your content? Great visuals engage your audience and make a lasting impact. But where can you find the perfect images? Let’s explore some ways.
Stock photo websites are a great source of professionally shot photographs and graphics. Their search functions let you narrow down options by keywords or categories. Landscapes, portraits – there’s something for every creative need.
Creative Commons is another option. Here, you can find images shared by photographers and artists for public use. Plus, you’ll respect copyright regulations.
Images can add credibility and authenticity to your message. Take Jane, a freelance writer. She wanted to elevate her blog post about dream destinations in Italy. So, she reached out to local photographers who could capture the stunning views. Their photos, plus her vivid descriptions, made a unique experience for readers.
Remember the power of images – conveying emotions, telling stories, and leaving an indelible impression. There’s no limit to what you can create with the right visuals!
Adjusting Image Size and Placement
- Find the image’s original size . This helps you identify what changes you need.
- Scale it correctly . Use HTML tags to keep the same shape.
- Fit different devices . Your content might be seen on various screens. Resize the image to make it look good on all of them.
- Put the image near the text . It should look balanced. Decide if it should be left or right of text.
- Use CSS if needed . CSS gives you more control to get the perfect result.
Remember, larger images can slow down your page. So, try to keep a good quality and file size balance.
Did you know? According to a study, users look longer at images that are near text than at images that are by themselves.
Therefore, adjusting image size and placement is key for making content look good and ensuring an enjoyable experience.
Incorporating Design Elements
To incorporate design elements in your flyer creation process, turn to Microsoft Word for a user-friendly solution. Start by utilizing pre-designed templates and themes, which will save you time and effort. Next, explore the options for customizing colors and backgrounds, allowing you to align the flyer’s aesthetics with your brand or purpose seamlessly.
Using Templates and Themes
Templates and Themes offer lots of choices for all industries, purposes, and preferences. No need to start from zero, so it’s efficient! It also creates a consistent look . Customize them to fit your needs. Plus, they work across platforms. All this, at a very small cost compared to employing a designer.
Did you know Templates and Themes allow you to easily add multimedia elements to your design? A great bonus!
The 90s saw the rise of HTML templates. Since then, they’ve evolved to meet changing trends and expectations. Today, Templates and Themes are still revolutionizing how we use design elements in our projects. Convenient and versatile!
Customizing Colors and Backgrounds
Colors are essential for design. They can lift emotions and set a mood. By changing colors and backgrounds, you can make your designs more eye-catching and interesting.
Choose colors that match your brand, message, and audience. Reds and oranges can excite, while blues and greens bring calmness and trust.
Backgrounds are also important. They form the canvas for your content. A good background can draw attention to key elements without overwhelming.
Harmonize your design with gradients or overlays. These techniques add depth and make designs more captivating. Test out different colors to find the best fit.
Now is the time to get creative! Mix colors, backgrounds, and effects. Use trends, but also think outside the box.
By customizing colors and backgrounds, you can make an impact on your viewers. Show off your brand’s personality and leave them wanting more.
Designing is about more than aesthetics. It’s about connecting with people. Customizing colors and backgrounds lets you do this. Unlock the full potential of your designs and create something remarkable.
Arranging and Organizing Content
To organize your content effectively in making a flyer on Microsoft Word, try arranging and organizing the content with the sub-sections as solutions. Creating Columns and Layouts will provide a structured and visually appealing design, while Adding s and Subheadings will help to categorize information and guide readers through the flyer.
Creating Columns and Layouts
Think about the number of columns and their alignment when designing your layout. This depends on the content and look you’re aiming for. Use a grid system to keep your columns orderly. This’ll give a more professional feel. Try different column widths too! Wider columns for headlines or featured content, narrower ones for secondary info.
Adding Headings and Subheadings
Guidelines for Creating Headings in Content
Choose Relevant Headings
Identify main ideas for your content. They are the basis of your headings.
Utilize Hierarchy
Use different levels of headings to create a clear structure.
Keep it Concise
Make sure your headings are brief but still explain the section.
Use Formatting
Bold, italicize, or underline to make headings stand out.
Ensure Consistency
Use the same format for all headings and subheadings.
Test Readability
Read headings and subheadings to check the structure’s logic.
Other Suggestions
- Incorporate keywords for SEO
- Highlight key points
- Think of the target audience
Maximize Benefits
Well-structured content engages readers and communicates the message.
So, take the time to add headings and subheadings. It will have a big impact!
Making the Flyer Eye-Catching
To make your flyer eye-catching, use bold headings and attention-grabbing text. This will instantly draw the reader’s attention and generate curiosity. Additionally, including graphics and visual elements enhances the overall visual appeal of the flyer, making it more engaging.
Using Bold Headings and Attention-Grabbing Text
Bold headings are key for a captivating flyer. Make sure the font is large and suited to the tone. Use impactful words to spark interest and motivate readers.
Wordplay, concise phrases and unexpected language choices can create intrigue.
Complementary visuals and colors convey the mood and amplify the message. Stunning imagery plus bold headings create a memorable flyer.
Including Graphics and Visual Elements
Graphics? Use high-quality images or illustrations! Relevant to content. Visuals should enhance design and grab attention. Bright and vibrant colors – but don’t overdo it! Color scheme should complement branding or theme. Infographics or charts work too – for complex information.
Typography and text layout – must be easy to read and reflect style or tone. Experiment with font sizes and styles. Careful consideration of these elements will ensure visually appealing text that enhances impact.
Incorporate these suggestions for an eye-catching flyer that communicates your message. Success!
Proofreading and Finalizing the Flyer
To perfect your flyer in Microsoft Word, efficiently proofread and finalize it. Checking for spelling and grammar errors ensures a polished result. Then, previewing and making corrections allow you to fine-tune the flyer’s appearance.
Checking for Spelling and Grammar Errors
Errors in spelling and grammar can damage your flyer’s credibility. Follow these steps for a perfect result:
- Read your flyer over carefully to spot any mistakes.
- Use a spell-checker to double-check.
- Check for common grammar errors like subject-verb agreement, wrong verb tenses, and misplaced punctuation.
- Ask a colleague or friend with great language skills to review it.
- Read your flyer out loud to spot any awkward phrasing or unclear sentences.
It’s essential that every word and sentence is error-free. Mistakes can lead to confusion and make readers doubt you. Every mistake avoided brings you closer to a professional final product.
Previewing and Making Corrections
Previewing and corrections are key in creating a great flyer. Here’s a 5-step approach:
- Scan the flyer for words, sentences, and paragraphs.
- Mind grammar and spelling mistakes.
- Correct any errors.
- Assess images, graphics, and colors.
- Ensure they look good and fit the design.
- Make adjustments or modifications.
- Double-check contact info, dates, times, and locations.
- Confirm accuracy and update if needed.
- Read through the flyer.
- Check font sizes, styles, and colors.
- Adjust if needed.
- Share with friends, family, or colleagues.
- Collect constructive criticism and suggestions.
- Consider their feedback and make changes.
These steps will help you make a great flyer, fit for your target audience.
Replace wordy expressions with concise alternatives. Use bullet points or lists to make it clearer. Use subheadings and bold fonts to guide readers. This will improve the quality and readability of your flyer.
Printing and Sharing the Flyer
To efficiently print and share your flyer created on Microsoft Word, follow these steps. First, save the flyer as a PDF or image file. This ensures easy sharing and maintains the design integrity. Next, proceed with either printing the flyer directly or sharing it digitally. These sub-sections provide solutions for effectively distributing your flyer to reach your desired audience.
Saving the Flyer as a PDF or Image File
- Click the “File” tab on the top left corner of your screen. A menu should appear.
- From the menu, select “Save As.” This will open a dialog box. Here, you can choose the desired format of your flyer.
- In the dialog box, select either PDF or Image from the list of options. Choose the folder to save your file. Lastly, click on the “Save” button.
Make sure to save your flyer in a format that meets your needs and is easy to share. You can also compress the file size before sharing, by using online tools or software.
One user shared how they saved their flyer as a PDF . They were arranging an event and wanted to send out digital copies of their flyer. They found that not everyone had the same software to open HTML or Word documents. So, they opted for saving their flyer as a PDF file. This enabled them to easily share it with anyone who could open PDF files, thus ensuring their message reached a greater audience seamlessly.
Remember, when saving your flyer, think about compatibility and access for those who will receive it.
Printing the Flyer or Sharing it Digitally
When it comes to promoting your event or business, there are two main choices: print a flyer or share it digitally . Let’s look at both!
- Printing flyers is perfect for reaching a local audience. Show it in public places like businesses, community centers, etc. to grab attention.
- Digital flyers can be shared via social media, email, and websites. They can also have interactive elements like videos and images.
- Print flyers offer an actual experience to recipients. It adds a personal connection that digital platforms can’t offer.
- Digital flyers are easy to edit and update . Making changes doesn’t require reprinting hundreds of copies.
Considering your target audience and their preferences is important. Some prefer printed materials, others digital formats. Offering both is a great way to reach more people.
Marketing Sherpa Magazine states that print advertising is still one of the most trusted forms of advertising. Utilize both strategies – print and digital – for maximum exposure.
Creating a flyer on Microsoft Word is simple and efficient for promoting an event or business. With the right tools and techniques, you can design an eye-catching flyer. Here are step-by-step instructions on how to make one.
- Open a blank document in Microsoft Word and set the page layout. Choose from templates or customize your own design with fonts, colors, and images. Make sure the flyer has a clear message that conveys the purpose.
- Organize content in an appealing way. Use headings, subheadings, and bullet points. Include high-quality images and graphics that are relevant. Experiment with font sizes and styles to emphasize key details.
- Decide how to distribute the flyer. Print it on high-quality paper or save as a PDF. Utilize social media or email marketing campaigns. Simplicity is key, so avoid overcrowding the layout.
For example, a small local bakery was struggling with customer awareness. They created a flyer on Microsoft Word and distributed it along with free samples. Soon they noticed an increase in foot traffic and sales. Through this tool, they effectively communicated their value proposition and attracted new customers.

No credit card required
Your projects are processes, Take control of them today.
How to Make a Flyer in Microsoft Word

Microsoft Word has other uses that you might not be aware of. One of which is the ability to create flyers. Here’s how.
While Microsoft Word is better known as a word processor, built to write lines and lines of text, it has other uses that you might not be aware of.
For instance, if you’re looking to make flyers, you can do this in Word. There are plenty of document templates available, allowing you create the perfect flyer with minimal fuss.
If you want to make a flyer in Microsoft Word, here’s what you’ll need to do.
Create a Flyer Using a Template
The easiest way to make a flyer in Microsoft Word is to use one of the ready-made templates that are included in Word itself.
You can find these templates from the main launch screen which opens when you launch Word itself. If you’re already working on a file, click the File tab on the ribbon bar to access this menu.

From the File tab, click the New option in the left-hand menu.

In the Search for online templates box, type Flyers to search for flyer templates, then hit the Enter key on your keyboard.

A selection of different flyer templates will become visible. You can click on any of these to find out more about the template and the options it comes with.

When you’ve found a template you like the look of, click the Create button. This will download the template and open it as a new document.
Congratulations! You’ve just created your first flyer in Microsoft Word. From here, you can begin editing the contents of the template to fit your needs.
Edit a Flyer
You’ve got the basic template, now you need the content. To begin editing your flyer, you’ll need to work within the confines of the template itself.
To change any of the placeholder text, you first need to click it using your mouse. It should show a semi-transparent highlight when this has been done correctly.

With your text box selected, you can begin typing. Any text you add or edit will appear on your flyer.

Repeat this for any (or all) of the text you’re looking to change. If there are any sections you want to delete, highlight it and hit the Delete or Backspace keys on your keyboard to remove it.
If you want to change a picture on your template, right-click on the image to bring up the context menu.

Hover over to enter the Change Picture menu. From there, you can select one of the available options to replace your image. These include:
- From a File allows you to choose any file on your computer to replace the image.
- From Stock Images allows you to search Word’s collection of stock images to find something suitable.
- For online images, the From Online Sources option lets you choose from a collection of online pictures powered by Bing.
- From Icons launches the same window as From Online Sources , but automatically switches to the Icons tab which includes symbols, emojis, and more.
- From Clipboard to paste a saved image from your clipboard into your Word document.

Once you’ve found the image that you want t0 use, click on it, then hit the Insert option.
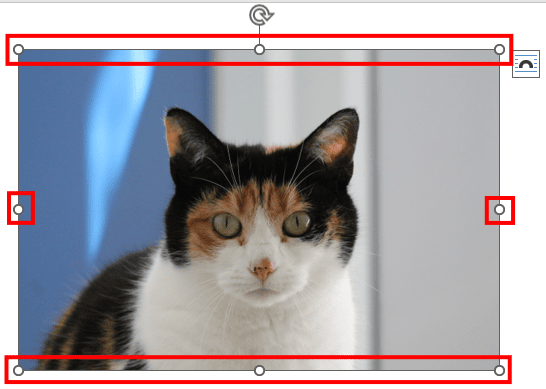
It will then be added to your flyer. You can use the white dots around the outside of your image to resize your image to fit your flyer template.

Once you’re happy with your template, you can save it or print it to export it elsewhere. If you’re not happy with the results, you can always choose a different template to try out instead.
Advanced Document Creation in Microsoft Word
Word has a lot of powerful features that can help you to create the documents you want quickly and easily. It isn’t just a word processor, after all.
You can learn how to remove page breaks in Word to help you rearrange your content. If you want to make your text stand out, you could indent your text for extra emphasis.
You could even decide to give up on text altogether and instead learn how to draw in Word to create drawings or to edit existing images. The more you learn about Word’s advanced features, the more impressive your documents should become.
Recommended for you

How to Create Flyers with Microsoft Word
The complete word flyer design tutorial on one page… for word 2003, 2007 and 2010.

This page is a step-by-step tutorial on how to create flyers with Microsoft Word… with detailed instructions for Word versions 2003, 2007 and 2010.
I originally created this Word flyer tutorial in 2006 for clients who wanted to update their own marketing materials… but didn’t own Microsoft Publisher, which was the desktop publishing program I was using at the time.
My first flyer design tutorial was for Word version 2003 and I’ve updated the lessons since then to include the new tweaks for Word 2007 and Word 2010, which is the latest version I own.
You’ll learn the basics of:
- Page margins
- Font styles and sizes
- Font embedding’
- Paragraph indenting
- Paragraph and line spacing
- Inserting graphics
- Wrapping your text around graphics
- Resizing, repositioning, cropping and rotating graphics
- Working with Microsoft’s FREE templates
Set Up The Quick Access Toolbar First
Word 2007-2010 users – here’s how to place your most-used shortcut icons on your toolbar.
Setting up your toolbar to include the icons you use most will save you a ton of time and frustration.
Click on the Office Button (the Windows symbol)
Click on Word Options
Click on Customize
Find icons for the commands you use most in the “Choose Commands From” box on the left side and “ADD” them to the “Customize Quick Access Toolbar” box on the right side. Don’t forget to click OK.
Click on the File tab
Click on Options
Click on Quick Access Toolbar
Choose the commands you use the most and want handy and “ADD” them to the “Customize Quick Access Toolbar” box on the right side.
These are the shortcut icons I use:
Print Preview
You’ll likely see others that you’ll want to add, such as copy and paste. (I use Control C and Control P for these).
To place these icons where you can easily see them, click on Add and when your list is complete in the right hand box, you can rearrange them by using the up and down arrows.
12 Flyer design essentials – start here
- White space around your text makes it easier for people to read your flyer’s content. Try not to jam too much into one area.
- BORDER DON’T: If you place your border too close to the text, it makes it hard to read and people will tend to ignore what you have to say. (See more about borders below.)
- HEADLINE DO: A catchy headline draws people in better than a boring headline. For super headline ideas, get a copy of Tested Advertising Methods the renowned classic by John Caples. Mine is highlighted, underlined and sticky-noted.
- SUBHEADS: Subheadings make your flyer text easier to read (breaks text into more manageable chunks) and allow people to scan your flyer for pertinent points. Folks should be able to scan your headline and subheads and know what your flyer is trying to tell them.
- Make sure you “ask for the sale.” If you want people to call you, make sure you say, “Call so-and-so at XXX-XXX-XXXX” or “Call XXX-XXX-XXXX to register before (date) for your early bird discount.” Know what you’d like your reader to do… and ask them to do it.
- If your flyer is announcing a class or workshop, make sure all of your contact information is included. Also, the time, place, and cost should be easy to find on the flyer.
- “UNDO” YOUR MISTAKES – Learn how to use the “undo” function. If you make a mistake and want to revert to what you had before you made the mistake (or chose a color you didn’t like, or placed a border that didn’t work, etc.), click on the Undo option. You can undo quite a few previous actions by hitting “undo” over and over. Stop undoing when you get back to where you want to be… so you can start over.IN WORD 2007 and 2010, find UNDO by right-clicking (anywhere) on the Ribbon (toolbar with all the tabs), selecting Customize Quick Access Toolbar, selecting the Undo icon, adding it to the section on the right and hitting OK to save.
- USE THESE TOOLBARS: To use Word for flyers, make sure you have the right toolbars open (so your shortcuts – represented by those little graphical icons – are visible and handy): Go to View; Toolbars; and make sure these are checked: Standard, Formatting, Drawing, Picture, Reviewing and PDF Maker. See below for Word 2007/2010 how-to’s.
- It’s easiest to see what your finished flyer will look like if you’re viewing it in “Print Layout.” On the top line, click on View, then Print Layout. In WORD 2007 and 2010, find the Print Layout option at the View tab.
- AUTOCORRECT OPTIONS: In Word 2003, choose these “autocorrect” options at Tools, Autocorrect Options, Autoformat: Check “replace straight quotes with curly quotes” and “replace hyphens (–) with dash.” I like to UNcheck automatic bullet and number lists, because they pop up when I don’t need ’em. I can always add a number or bullet list quickly using the icons on my toolbar instead.For WORD 2007, click on the Office Button, click on Word Options, click on Proofing, then click on AutoCorrect Options and choose your preferences. In Word 2010, you can click on the File tab, then Options, then Proofing. The AutoCorrect options are at the top of the pop-up page.
- In WORD 2007 and 2010, you can convert your Word flyer to a PDF document by using the “Save As” function.
- Don’t forget to EMBED YOUR FONTS if you’re emailing your flyers (see how below).
(1) Set Your Page Margins
Sufficient white space sets off your text for easier reading.
To set your top, bottom, right and left margins so that you have enough space for a border outside your text, go to:
File (it’s on the top line)
Page Setup (from the drop-down menu)
WORD 2007 and 2010:
Click on Page Layout tab
Click on the Margins drop-down box
Choose the default margins or customize for your own preferences
I like to use a minimum of 1″ for margins, even up to 1.25 inches, depending on how much text I have.
In Page Setup (Word 2003) or Page Layout (Word 2007-2010), you can change your header and footer settings to 0 inches if you don’t need page numbering, or a title across the top of all the pages, or a copyright notice on the bottom of all the pages. For a one-page flyer, try 1 to 1.25 inches for your margin, with no headers and footers.

Border example from Dreamstime.com
(2) Make a Border Around Your Page
Page borders (not text box borders).
For a simple border around your page (and not around your text box), go to:
Click on Page Borders button
Click on Box (or shadow box or 3-D box)
Choose the Style you want (plain border, dashed, dotted, zig-zag, double line, shaded line, etc. Choose these from the drop-down menu).
Choose the Color you want (a) from the drop down box… or (b) click on More Line Colors to see additional colors.
Page Layout tab
Page Borders
At Settings, choose the box type you want (box, shadow, 3-D, custom)
Choose style (solid, dotted, etc.)
Choose color
Choose the width (thickness) of the line
Choose ART if you want a graphical border around your page
Click Options to set your border farther away from (measure from) the “Edge of Page” or your “Text” box.
Increase the number of points that you want between your text and border.
TEMPLATES – Create Flyers the Easy Way
If you find a pre-designed format that works for you… it simplifies everything..
If you don’t like designing “from scratch,” here’s a way to make flyers quickly and easily. (The flyer below is a stock template I found using the instructions for Word 2010 below.) You can also click here to access additional templates at Microsoft.com.

Flyer template – just add words
In WORD 2003 , click on FILE, then NEW.
On the right side of the screen, you’ll see a number of options.
Scroll down to see all the template options. Click on FLYERS.
Click on the flyer option you’d like to work with, choosing: Event, Marketing, Real Estate or Other.
Then scroll through the numerous possibilities and click on one you’d like to use for your flyer.
You’ll be taken to a Download page. Click the DOWNLOAD button and this will open a new Word document, which you can immediately start working with. Just change the template’s wording for your own and print.
To make a new flyer from a template, click on “New.”
Under Microsoft Office Online, find “Flyers” and click on it.
You can enter a search term for a specific type of template (e.g. – “open house” or “birthday party.”)
Or choose the options listed: Event, Marketing, Real Estate or Other Flyers.
Click the Download button to open the template on your own computer. You can enter the text in the boxes already there or delete them and place your own. See below for how to insert graphics.
Click on the File Tab
Click on New
Click on Flyers (you’ll have a huge array of options in addition to flyers, including gift certificates, greeting cards, resumes, etc.)
Search through the 9 files for a design you like and double-click to download it.
Replace the text with your own and SAVE AS a new title in a file folder in the documents section of your computer (or desktop).
In Word 2010, you can also add a theme to your flyer.
Click on the Page Layout tab
Click on Themes
You can automatically change font types and colors for your entire document. Experiment with Themes to see which ones you like.

(3) How to Choose and Work with Fonts
Fonts are important… if you want people to actually read your flyer.
You can type all your text first… and then change the fonts from whatever is set as your “default” font (often Times New Roman) or you can enter text and change it as you go along.
To change fonts within a document or flyer, select the text you want to change and click on:
Choose a strong, bold headline font for the main heading. You could use this same font in smaller type or in italics for your subheads.
Type your headline. If you want to make it look fancier, you could format it with WordArt: Select your headline text, click on Insert, Picture, WordArt and choose the WordArt shape and color you like. The Edit WordArt Text box pops up where you can change the font style and size to fit your flyer. If you right click on your WordArt text, a box pops up that lets you do even more.
For the main text of your flyer, choose an easy-to-read font. A “serif” font such as Times New Roman works well if there is lots to read. If you don’t have a lot of text, a sans-serif font such as Arial or Futura works well.
Try not to use more than 2-3 different fonts within one flyer or document. If you want text to stand out, you could use the italics and bold options for variety. Don’t underline too much either – just a single word here and there – otherwise your text will be too hard to read. If you like fancy fonts, they’re okay for short headings, but not for blocks of text.
Start with an 11 or 12 point size until you see how much space it all takes up. You can always select the text and go back to Format, Font to change the size or bolding/italics, etc. Your toolbar should show the font names and sizes in drop-down menus, which makes changing your font types and sizes even quicker and easier. Make sure your “Formatting” tool bar is checked to access this feature.
You’ll notice some fancier font options for embossing, outlining, underlining, color, etc. Play with these to see what looks good. You can even have different colors for the text and underlining.
At the Home tab, choose the Font Type and Size from the drop down boxes.
Or choose Theme for your document (Page Layout tab, click on Themes).
(3a) How to EMBED Your Fonts
This is a must if you email your flyers as word documents..
*** EMBED YOUR FONTS if you’re planning to email your flyer or make a PDF file of your flyer. Not everyone has the same fonts on their computer and if you don’t embed your fonts when you send your flyer to someone else, it could end up looking very different.
Go to Tools, Options, click on the Save tab, and choose Embed True Type Fonts. Save your changes.
Click on the Office Button
Click on Save
Check the box for “Embed fonts in the file”
You can also check the box “Do not embed common system fonts” to save memory space
You can also check the box “Do not embed common system fonts” to save memory space.
(4) Format Your Paragraphs
This automates so much of your work.

You can make things easier on yourself by setting up your paragraph formatting ahead of time. Just make sure you first place your cursor somewhere in the text you wish to format. In the graphic to the right (a flyer I created for a client), you’ll see examples of centered, flush left and justified text… all in different text boxes.
Set your paragraph alignment by clicking on:
General: Alignment
From the Alignment drop-down box, choose Left, Right, Center or Justified.
Set your indentations next:
Indentation
For equal indentations to set off a paragraph within a larger section of text, use the left and right indentations, making sure the numbers are equal.
For First Line Indent, choose .2 inches to start with and see how it looks. This will indent ONLY the first line of each paragraph.
Set line spacing next:
Line spacing
You can set your spacing between lines to single space, 1.5 lines of spacing or double space. There’s also a “custom” option that lets you be even more exact. You can use “at least” or “exactly” and set your line points in relation to the points of your font size. Don’t be afraid to play with this, because it’s easy to change. The aim is to make it easy for people to read your flyer.
Set paragraph spacing:
You can set paragraph spacing for the entire document or for just 1-2 paragraphs at a time using the Spacing drop-down menus. Using this option helps you create a more professional-looking document than if you just hit “enter” twice for paragraph spacing.
You can create more white space above and below your text using the two menus “Above” and “Below.” They show increments of 6 points, but you can type in any number you wish, if you want less or more than 6, 12, or 18 points between paragraphs.
Choose points based on your font size. If you’re using 12 point Times New Roman, 12 point spacing is close to double spacing, except you don’t have to hit enter twice. For most print documents, double spacing or 12 points between paragraphs looks excessive. But if you don’t have much text, 12 points between paragraphs helps you to stretch things out.
WORD 2007-2010:
Set paragraph alignment at Home tab
Choose left, center, right or justify from the icons in the Paragraph section of the toolbar
Set Drop Cap at the Insert Tab
Indentation:
Go to Page Layout tab
Open the Paragraph drop-down box by clicking the shaded tiny box on the bottom right
Enter the amount of indentation you want for the entire paragraph.
First Line Indent:
For First Line Indent, use the Special drop-down tool and select 1st line, then select the amount of space you want to use for indenting the first line. Subsequent paragraphs will be indented by the same amount. Try .2 to start with and see if you like how it looks. No more “tab indenting.”
Line Spacing:
Set line spacing at the Home tab
Paragraph section
Line spacing drop-down box (it has little up-down arrows)
Choose the spacing you want between lines of text
This sets spacing between lines automatically
Paragraph Spacing:
Set paragraph spacing at the Page Layout tab
Go to the Spacing section
Place your cursor in the paragraph you wish to create spacing automatically for. You can choose to increase spacing above or below the paragraph. Select the amount of spacing you want – 6 points “after” is what I usually choose – and this will now space all subsequent paragraphs by 6 points. No more hitting the Enter key twice.

(5) Working With Graphics and Photos
Finally microsoft word makes working with graphics so much easier.
Here are a few tips for placing and editing your graphics and for wrapping your text around the graphics.
INSERT your graphic:
At the top of the screen, click on:
Picture (drop-down menu)
Choose what you’ll insert from another drop-down menu. For simplicity here, let’s just look at Clip Art.
(Hopefully, the graphic “Files on Your Computer” are stored in your “My Pictures” files, making them easy to find by going to Insert, Picture, From File, My Pictures. Your pictures downloaded from the Microsoft.com online clip art gallery could also be in a subfile of My Pictures called Microsoft Clip Organizer.)
Okay, so we’re back at:
In the menu area to the right of your text area, you’ll see a “Search” box. Enter the keyword for the clipart graphic you need for your flyer (candle, nurse, lighthouse, Christmas, happy people, etc.) and select “All Collections” and “All Media File Types” for the most numerous results. If you know you just want a photo, click on the drop-down arrow and uncheck everything except “Photographs.” If you just want clipart (no movies, sounds or photos), uncheck everything except clipart. Click on the Search button.
A number of graphics choices will appear and you just click on the one(s) you want and they’ll be placed on your flyer. See how to move them below.
RESIZE your graphic:
The original picture will most likely be too large for your flyer, and you can easily resize it by left clicking on it, and pulling IN from one of the corners. Or you can click on the picture, then RIGHT click on it and a box called “Format Picture” opens. Click on the size tab and specify in inches the desired height and width for your picture.
ROTATE your graphic:
In this same section of Format Picture (right click on the graphic), you can rotate your graphic by entering the number of degrees you’d like the picture to turn. If you’d like it rotated to the left, make sure to place a minus sign (-) before the number of degrees.
MOVE your graphic:
To move your pictures on the page, left click the picture, hold it down with the mouse while dragging it to where you’d like it placed.
To add graphics and photos, go to the Insert tab.
Click on “Picture” if the graphic is on your computer or “Clip Art” to access Microsoft’s clip art collection.
Edit clip art by right clicking on the graphic… you can even remove bits of the picture, if you want.
Double click on the graphic to open the Format Graphic section. Many new options are now arrayed on the toolbar.
Here you can add shadows, borders, rotate or flip the graphic, crop a section of the picture, wrap text around it and more.
You can also alter the brightness and contrast and re-color the graphic.
In Word 2010, you can do many, many things with graphics in Word that were not possible in previous versions. Actually worth the price of the software, if you use Word primarily for your flyers and other marketing documents.
(6) Format Your Graphics and Photos
Word has greatly improved its graphics functions.
Convert your picture from color to GRAYSCALE or play with color combinations:
Change a color graphic to grayscale by right clicking on the graphic, then click on the Picture tab. At the Image Control drop-down menu you can play with Color, by choosing automatic, grayscale, black and white or washout. You can increase brightness and contrast here, too.
CROP your picture:
You can also crop the picture on this section of Format Picture… or use the “Crop Tool” on your toolbar… it looks like two diagonal XXs. Click on the graphic and then on the crop tool and drag in the sides or corners to give your picture the look you want. You can remove sections of the background and other people and things you don’t want showing in your graphic.
Make a BORDER for your graphic:
Right click the graphic. Click on “Borders and Shading” on the drop-down menu. Click on the “Borders” tab and check “Box.” Choose the type of border you’d like: single line, double line, dotted line, zigzag, etc. and choose the color and width of the line from the drop-down menus.
WRAP TEXT around your graphic:
Right click your picture, click the Layout tab, and choose how you’d like your text to wrap around your picture. If you want white space on the sides of the graphic, choose the first option “In Line With Text.” This puts your first line of text at the bottom right of the graphic (the default that Microsoft Word gives for this option).
If you want your text to start higher up beside your picture, choose “Square” or “Tight.” You can also type text on top of the graphic – just make sure that “behind text” is selected in the “Wrapping Styles” section.
ROTATE/FLIP your graphics:
Is your photo facing the wrong way into the text? A photo placed on the left of the page should look toward the right – drawing the reader’s eye INTO the text. A photo placed on the right should be looking into the text toward the left. If you need your photo in a specific place for the design, but the eyes/face are looking in the wrong direction, you can flip the photo horizontally.
Make sure your Drawing toolbar has the pyramid-looking icons (flipping tools). If it doesn’t, go to View, Toolbars, Customize, Drawing… scroll down for the rotate and flip choices and DRAG them to the toolbar (along with any other nifty shortcuts that caught your eye. They save going to Format, Picture, etc.)
Flip your photo by left clicking on it, then clicking on the back-to-back pyramid-looking things on the toolbar (one gray, one purple). Your photo should now be looking in the direction you need.
All of these functions are available when you right click the graphic and select Format Picture… or click on the “Format” tab for even more options.
You can also do quite a lot with your graphics using Microsoft Picture Manager, which is included as a “tool” in the Microsoft Office package.
© 2006-2015 Barbara Casey
Related Posts

In the right panel, under New , click the Blank Document icon.
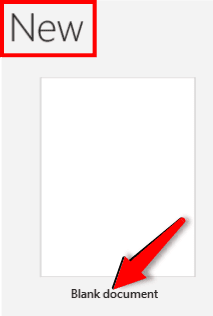
Word will open a new black document.
Step #2: Resize the Page
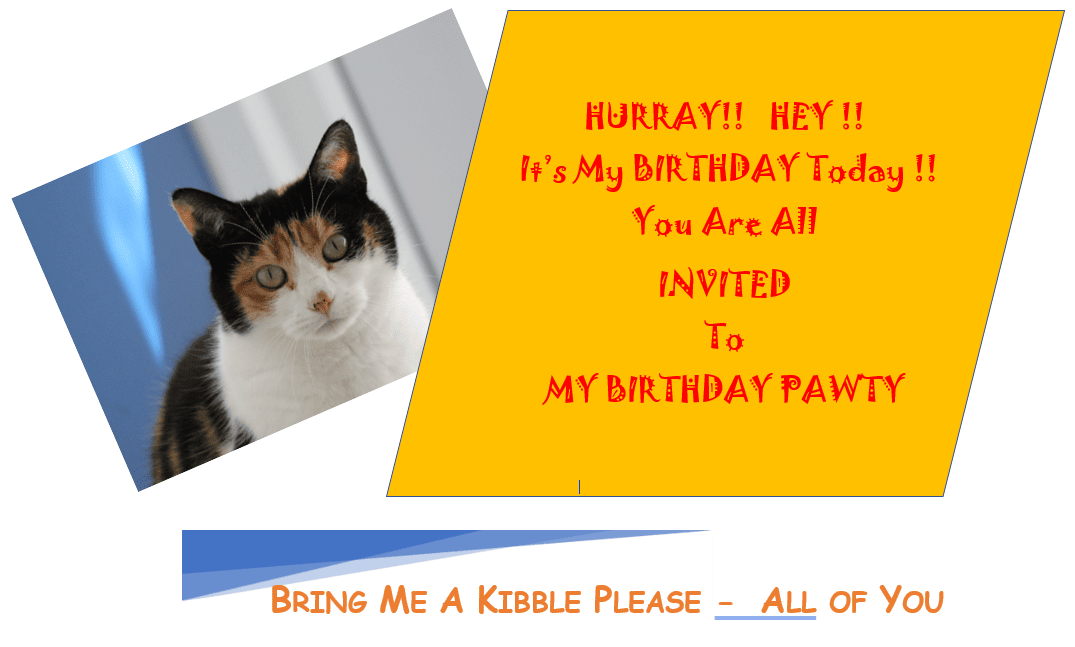
Note: It is advisable to resize the page to a standard paper size before you begin. US and Canada use letter-sized papers (8.5 x 11 inches) as standard. The international standard is the A4-sized paper (8.27 x 11.69 inches). We will use the A4 size. You can use any size to suit your requirement.
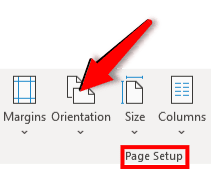
Click the Layout tab in the top menu bar to change the ribbon.

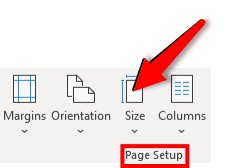
In the section Page Setup , click the Orientation icon.
In the menu that opens, click the Landscape icon.

The page will change to the landscape orientation.
In the section Page Setup , click the Size icon.
In the menu that opens, click the A4 icon.

The page will change its dimensions to A4.
In the section Page Setup , click the Margins icon.
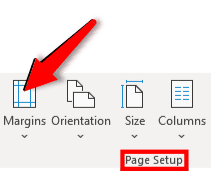
In the menu that opens, click the Narrow icon.

The page will change its margins to 0.5” all around.
Step #3: Insert an Image
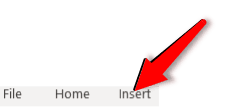
Click the Insert tab in the top menu bar to change the ribbon.

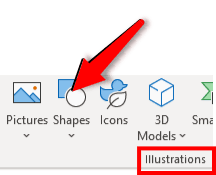
In the Illustrations section, click the Pictures icon.
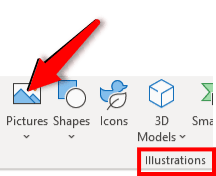
The Insert Pictures From menu will appear.
Click the appropriate source of your image.
Note: We will select an image from This Device… .
The File Explorer will open.
Navigate to the location of your image.
Select the image and click the Insert button.
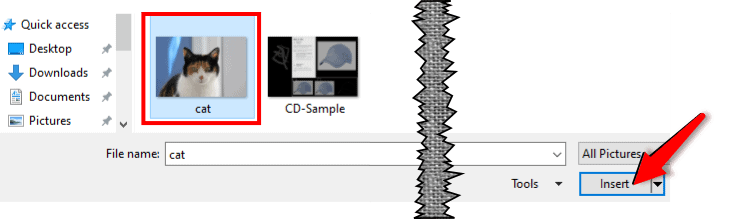
Word will insert the selected image into the page.
Change the size and orientation using the handles.
Step #4: Insert Basic Shapes
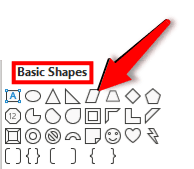
In the section Illustrations , click the Shapes icon.
A drop-down menu will appear.
Under Basic Shapes , click the Parallelogram icon.
The cursor will change to a cross.
Position the cross at a suitable location on the page.
Click and hold down the mouse button.
Drag the mouse to an opposite corner and release it.
Word draws a parallelogram on the page.
Size and position the Parallelogram appropriately, using its handles.

Step #5: Insert Text Box
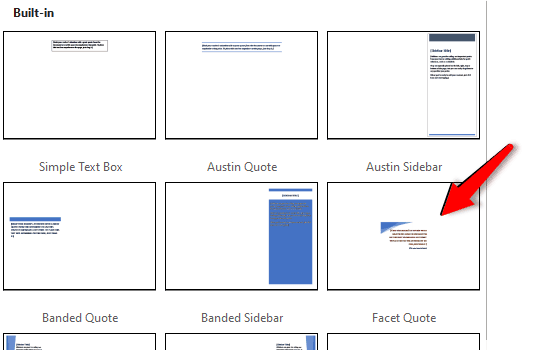
In the section Text , click the Text Box icon.
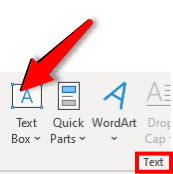
An array of built-in text boxes will appear.
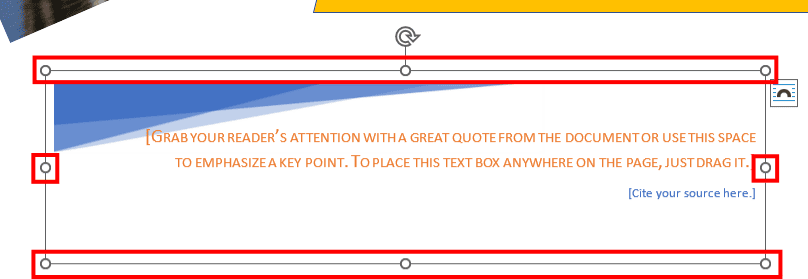
Click a suitable text box.
The selected text box will appear on the page.
Size and position the text box using its handles.
Step #6: Fill Text
Click the parallelogram to select it.
Right-click inside the parallelogram.
Click the Add Text icon.
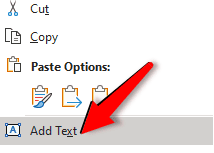
Fill in suitable text.

Click the text box.
Replace the text with relevant text.
Change the font, size, color, and position suitably.

Your flyer is ready for printing.
Method #2: Make a Flyer using Pre-Built Templates
Step #1: download a suitable template.

In the right panel, type Flyer , and click the search icon.
Word will open many pre-built flyer templates.
Click a suitable template to use.
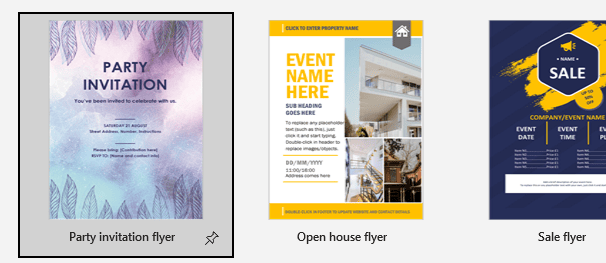
On the next screen, you will see an image of the template.
Click the Create button.

Word will download the template into a new page.
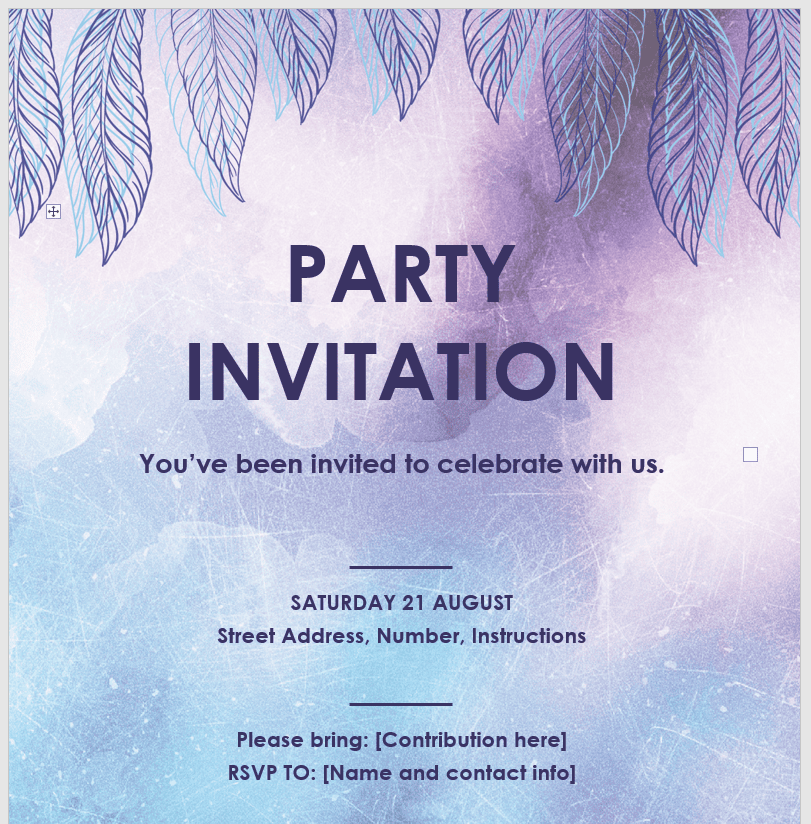
Step #2: Change the Text
Change the text in the flyer to your liking.
Your flyer is now ready for printing.

Method #3: Make a Flyer Using Free Templates from Websites
Step #1: select a template.
Fire up your favorite browser.
Go to the flyer templates website of Microsoft.
The website has many templates for flyers.
Click the one most suitable for your purpose.
Step #2: Download the Template
The next page will open.
Click the Customize in Word button.

You will have to sign in to your Microsoft account.
Microsoft 365 will open and display the chosen template.
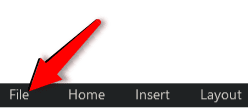
Click the File tab in the top menu bar to open the File menu.
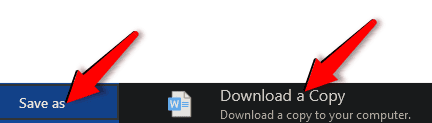
Click the Save as tab in the left pane.
Click the Download a Copy tab in the right pane.
A pop-up window will open.
Click the Download a copy tab.

File Explorer will open.
Navigate to the folder where you want to download the file.
Enter a proper file name.
Click on the Save tab.
Step #3: Open the Template
Open File Explorer.
Navigate to the folder where you have stored the downloaded file.
Click the file.
Word will open and display the flyer.
Step #4: Modify the Text
Click the text you want to modify.
Change the text appropriately.

We have shown you three methods of making a flyer using MS Word. Use the one most suitable for your application. If you have any questions, please ask in the comments section below.
Leave a Comment Cancel reply
Save my name, email, and website in this browser for the next time I comment.
How-To Geek
How to create a brochure in microsoft word.

Your changes have been saved
Email is sent
Email has already been sent
Please verify your email address.
You’ve reached your account maximum for followed topics.
Android Users Should Disable 2G Connectivity, Says Google
I replaced default linux commands with these powerful alternatives, why you should (or shouldn't) get a static ip from your isp, quick links, create a brochure using templates, create a brochure from scratch.
Brochures are a handy marketing tool used by nearly every company in existence. Creating them takes only a few minutes, and you can do it directly in Word using a template or from scratch. Here’s how.
The easiest way to create a brochure is by using one of the many available templates that Word has to offer.
Related: How to Make Vertical Tear-Off Pages in Microsoft Word
To get started with a template, open a new document, type “Brochure” in the template search box, then press the “Enter” key. Word’s large library of brochure templates will appear. Select one that you like.

Once selected, a banner that contains information about the template will appear. Read through the information and then select the “Create” button.

Now all you need to do is insert the relevant text and images in the template placeholders and then start distributing the brochure.
If you couldn’t find a template that was just right for you, you can just make one from scratch.
With your new blank document open, head over to the “Layout” tab. Here, select the “Orientation” option found in the “Page Setup” section. From the drop-down menu that appears, select “Landscape,” which is the necessary orientation for tri-folds.

Next, let’s give ourselves a little more room to work with by reducing the page margins. To do this, head back over to the “Page Setup” group of the “Layout” tab and select the “Margins” button.

For brochures, it’s generally a good idea to keep the page margins at 0.5” or less. Selecting the “Narrow” option from the drop-down menu is the quick solution. If you want to decrease the margins even more, you can select “Custom Margins” and input your ideal size.

Now it’s time to add columns to our brochure to break the page up in different sections. Back in the “Page Setup” group of the “Layout” tab, select the “Columns” button.

A drop-down menu will appear. Here, select the column structure from the list that you’d like to use or explore more options by choosing the “More Columns” option.

With the layout ready, all that’s left to do is insert your images (by selecting an option from the “Illustrations” group and choosing the graphic) and add text. Once finished, your brochures will be ready for distribution.
- Microsoft Office
- Microsoft Word
- office 2019
- Free Templates
Number of items in cart: 0
- Your cart is empty.
- Total: $0.00
Word Flyer Templates
Make a flyer that gets noticed with our professionally designed flyer templates for Microsoft Word. Get a fast start with customizable page layouts complete with photos and artwork. Download now!

- Real Estate
- Advertising
- Landscaping
- Construction

Health Fair Flyer & Ad Template

Business Training Flyer & Ad Template

Contractor Flyer & Ad Template

Interior Design Flyer & Ad Template

Medical Insurance Flyer & Ad Template

Landscape Design Flyer & Ad Template

Farmers Market Flyer & Ad Template

Farming & Agriculture Flyer & Ad Template

Urban Landscaping Flyer & Ad Template

Harvest Festival Flyer & Ad Template

Organic Food Flyer & Ad Template

Car Wash Flyer & Ad Template

Trucking & Transport Flyer & Ad Template

Auto Detailing Flyer & Ad Template

Auto Mechanic Flyer & Ad Template

Aviation Flight Instructor Flyer & Ad Template

Oil Change Flyer & Ad Template

Casino Night Flyer & Ad Template

Child Development School Flyer & Ad Template

Moving Service Flyer & Ad Template

Driving School Flyer & Ad Template

Babysitting & Daycare Flyer & Ad Template

Kids Club Flyer & Ad Template

Electrician Flyer & Ad Template

Try before you buy!
Try one of our free flyer templates for Microsoft Word to see how they work. Simply download a template, customize the design, and print!
How to make a flyer using Word flyer templates
Follow these easy steps to quickly format a flyer using Microsoft Word.
1. Start with a design template
StockLayouts ready-made design templates provide an excellent starting point to help you create your own flyer. Our designers have created thousands of layouts that are artistic and tailored for a wide selection of businesses. Search the design library for flyer examples and download editable files for Microsoft Word.
2. Add your own images and logo
The professionally designed flyer layouts come with high quality stock photos, original artwork and logo designs. You can choose to keep the photos and artwork or replace them with your own. Insert your own photos and clip art, or cut and paste from other StockLayouts templates to make a custom flyer.
3. Add your own text and pick fonts
The layouts include text boxes filled with “Latin” placeholder text and suggested copy content for heads and subheads. Font, size, style and color of text has been carefully formatted and placed in the layout to make it easy to customize. To edit the placeholder text, simply select it and replace it with your own information to create a unique flyer design.
4. Choose colors that suit your brand
To evoke just the right feeling, a perfect combination of colors is composed by our designers. The color palette is crafted to complement the photos and artwork included with each layout. Colors can be easily adjusted in the flyer layout to create your own preferred color theme.
5. Print in-house or send it out
The layout files are carefully executed to meet exacting prepress standards and to ensure high-quality color output. When your flyer design is complete, print it in-house on your own color printer, send it out for professional printing, or make PDFs to distribute online.
By Application
- Sign in
Unsupported browser
This site was designed for modern browsers and tested with Internet Explorer version 10 and later.
It may not look or work correctly on your browser.
20+ Best Free Microsoft Word Flyer Templates (Printable Downloads for 2019)
Do you need to announce an upcoming sale? Do you want to promote your booth at a trade fair? Is it time to publicise the opening of a new store? Flyers are an eye-catching and cost-effective way to successfully target your ideal customer.

Often, businesses have no idea where to begin when it comes to producing great flyers. This inevitably leads to flyers that are so poorly designed that potential clients don’t even notice them.
Ensure that you get the design aspect of creating your flyer right. Use a Microsoft flyer templates , like those available at Envato Elements and GraphicRiver.
Best Source for Premium Microsoft Word Flyer Templates (With Unlimited Use)

What makes flyer templates for Word so indispensable to businesses is that they're beautifully designed. Also, they save you time and money over trying to design your own flyers from scratch Word.
When it comes to top quality premium Microsoft flyer templates, Envato Elements should be your first stop. Elements offers a huge and varied selection of flyer templates for Word. You can customise them extensively to create a look that's as unique as your business. The templates are also yours to change and adapt to different occasions as often as you'd like.
In article, we'll share some of the best free flyer templates for Microsoft Word you can find on the web. These are useful if you need a flyer ASAP but have no budget to buy yourself a premium template. Remember though, even the best free template is no match for the top-quality Microsoft flyer templates found at Elements.
First, let's take a quick look at a few of the outstanding premium flyer templates for Word available on Envato Elements. You'll see what I mean:
1. Travel Flyer Template for Word
This stylish contemporary Microsoft Word flyer template uses a standard A4 size. Plus, it offers both a front and back layout.

Every aspect of the template is fully editable. So, you can add your own photos, change the objects in the design, the text and change all colours to match your brand or taste. A useful guide is included with this template.
2. Interior Flyer - Microsoft Word Flyer Template

Create a flyer in Word in a matter of minutes with this printable flyer template for Word. The template is designed specifically for home remodelling and furniture companies. But it's so versatile that it can be used by many other businesses.
The layered template offers free built-in fonts, both A4 and US letter size files. It also comes print ready with bleed.
3. Corporate Flyer Template

If you’re looking to create a flyer in Word for your next promotional campaign, recruitment drive or trade fair, check out this printable flyer template for Word. The template offers a great design. Plus, it comes in both A4 and A5 sizes. Just download, add your photos and details of your offer and your flyer is ready to be printed.
Envato Elements (Design Without Limits)

Envato Elements' premium flyer templates for Word are professional, versatile and easy to use. With unlimited downloads, choose as many printable flyer templates for Word as you want for one low monthly fee. This means you can try on as many templates as you want without incurring any extra costs.
That's the beauty of Envato Elements. One low monthly fee = unlimited access to flyer templates for Word and to thousands of premium digital assets like:
- business card templates
- and much more
But what if you want to buy only one Microsoft Word flyer template? Then GraphicRiver may be a better option for you.
Best Source for Premium Microsoft Word Flyer Templates (Buy One at a Time - 2019)

GraphicRiver is another resource that offers a plethora of excellence flyer templates for Word. Premium templates on GraphicRiver can be purchased one-at-a-time instead of as part of a monthly plan.
Let's look at a couple of examples:
1. Advertising Consultant Flyer for MS Word

This stylish and professional double-sided printable flyer template for Word comes in two formats: A4 and US letter size. You've got the option of using one or both sides of the template, according to your needs.
The template is easy to customise by swapping in your own images, changing the text, or choosing your preferred colours. If you get stuck, there's a handy help file included.
2. Corporate Flyer - Microsoft Flyer Template

Here's another elegant Microsoft Word flyer template that can be used for brand promotion or to announce a new product or venture. The layered double-sided template comes in A4 size. Like all flyer templates for Word offered at Elements and Graphic River, all elements of the template are fully editable.
Best Free Microsoft Word Flyer Templates
As a Microsoft Word user, you've got access to a library of free Word templates available through Microsoft Office. Here are some of the best:
1. Summer Party Flyer

2. Event Flyer Template for Word
Planning an event and looking for Microsoft flyer templates that are free to download? Check out this simple event flyer that features a photo at the top of the page and text placeholders where the details of your even can go.
3. Holiday Event Flyer
Be ready to let the world know about your Holiday event with this Santa themed flyer. Add the details like date and location details, along with a description of the event. Delete any placeholders you don't need. The template can be adjusted to accommodate a variety of paper sizes.
4. Flyer with Tear-Off Tabs and Art

This isn't just a free flyer template, but a template with eight tear off tabs that allows you to add contact information. So, interested parties can tear them off to remember your info. (This is a technique that predates mobile phones and may not be as relevant today.)
5. Music Flyer - Microsoft Flyer Template
Here's a free flyer templates for Microsoft Word that'll appeal to anyone who wants to promote a music or dance event. Add your info and use as is or modify the fonts and colour to customise the flyer to your taste.
6. Garage Sale Flyer
This is a simple landscape flyer for letting neighbours and strangers alike know that you're having a garage sale. This US letter size template is easy to customise. Just add your information and the free flyer templates for Microsoft Word is ready to use.
7. Event Flyer with Pickit Add-In

Here's a colourful template with colour block design for all your summer events. Let everyone know what's going on with this free printable flyer template for Word. It's got plenty of space to add text in different area of the template.
Use it for your summer event with this color block designed seasonal flyer template. Change the colour and fonts as needed. Use the Pickit free add-in for Office to replace the placeholder image with your own.
8. Event Flyer (Orange)
This Event Flyer is quite simple in style. It consists of one photo, the main heading, then two text heading and two sets of body text. The template wouldn't be suitable for communication lots of different information. But if you don't need to say much, the template will be adequate.
9. Business Flyer
This simple understated flyer template is designed for office-based business. The free flyer templates for Microsoft Word can be used to announce events like trade fairs and conferences. Or use it for direct marketing or to create brand awareness. Add photos, change colours and fonts to reflect your brand.
10. Zigzag Event Flyer

This free printable flyer templates for Word makes a pretty bold statement. It's got a photo forming the background of the flyer that's overplayed with a purple hue. On top of this is bold colourful chevron graphic details and equally bold and colourful text where you can write your event details.
11. Simple Flyer - Free Printable Flyer Template for Word
This template has a simple layout and uses only text to communicate its message. Because of this it's quite easy to customise.
Replace the placeholder text with a bold headline. Replace the date, time and place of your event and replace other necessary info. Your free printable flyer template for Word is ready for use.
12. Teacher Appreciation Flyer
The only thing better than an event to show appreciation for a beloved teacher is finding the perfect Microsoft flyer template that’s free to download (like this one). Customise the colours and text to create the exact look you want.
13. Item for Sale Flyer

Have you got a big-ticket item in your home for sale? Have you lost a beloved family pet and want to let the neighbours know you're looking for it? This is the template you'd use.
The free printable flyer template for Word allows you to add a photo to the background. Plus, you can add the usual relevant info. As we've seen with another template earlier, this one also has eight tear off tabs that allow you to add contact information. So, interested parties can tear them off to remember your contact info.
14. Small Business Flyer (green design)
If you’re trying to figure out how to make a flyer in Word for your plant business or any other kind of small business, this Microsoft flyer template is free to download and use. The template features a photo of hands repotting a plant. Plus, it's got simple graphics and two colours only. All this makes customisation quite straight forward.
15. BBQ Invitation Flyer
Here's another summer party event flyer. The one takes its inspiration from the barbecue party. This simple but fun free printable flyer template for Word features a peach background with orange accents and a barbecue grill in one corner of the template. The text is quite minimal and focuses on the title headline of the event, time, date, pace, address and room to RSVP.
16. Financial Business Flyer

Do you run a financial services company? Are you looking for a Microsoft flyer template that’s free to download? Look at this template designed specifically for businesses. Add your own image, company colours and fonts to make this template your own.
17. Sale Flyer - Microsoft Flyer Template
If you’re looking for a free flyer template for a sales event, this might just be the flyer for you. You can let your target audience know the when, where, and what of your sales event. Also, let them know about discounts etc. to get them excited about attending. Use this template as is or change the colours and fonts to suite your taste.
18. Side Hustle Flyer
Loads of people have part-time work or have found a way to make money doing something they love in addition to their full-time work. In America, these jobs are known as side hustles. If you want to bring in more clients or customers for your side hustle, this a great flyer for advertising your services.
19. Halloween Flyer

Here's a Halloween party invite with all the classic icons of Halloween. The flyer includes bats, eyes in the dark, a grinning jack o'lantern and a witch on a broom. This free printable flyer template for Word will help you create the perfect flyer for Halloween. You won't even have to do much customising.
20. Elegant Spring Flyer
This free flyer templates for Microsoft Word will help you create beautiful flyers for spring. The flyer used a photo of cheesy blossoms as the background image, with a red overlay to which you can add your text. There's more room for the text in the white horizontal space under the red overlay as well.
21. Flyer (Scallops Design)
This free flyer template can be used as a product awareness flyer for different kinds of businesses. The template is US letter size. It provides room for adding your own photos. To customise add your photos, text and preferred colours.
5 Quick Tips to Make Professional MS Word Flyer Designs
To make a flyer in Word that'll capture your audience's attention, you need a premium flyer template. But if you want your flyer to hold your audience's attention and persuade them to take a desired action, then you need to read these five quick tips to making effective flyers.

1. Always Keep Your Target Audience in Mind
You should have a clear picture of your ideal client/customer and what kind of lifestyle they've got. Knowing who you're targeting with your flyer will influence the design elements and language you use in your flyer. So, before you begin your flyer design, be clear about who you’re targeting.
2. Create a Bold Headline
Your flyer’s headline needs to be the first thing that your target audience will see. So, it’s got to catch their attention with its colour, size, and message. At first glance, it should tell your audience what your flyer is about and entice them to keep reading.

3. Make Your Graphics Compelling
The photos, illustrations, shapes, lines and colours you use in your flyer aren’t just about creating a pretty flyer. They all have a function. They should tie in with your business brand and accurately represent the type of service or product you offer. They should also appeal to your target audience and create an emotional response in them.
4. Add a Call to Action
Every flyer needs a call to action line. This is a message that makes the reader want to act. Here are some examples:
- Get your ticket today.
- Contact us.
- Enter to win.
A call to action lets your readers know how to act on what they've been reading.

5. Don't Forget Your Contact Information
Contact info like your website, email address, phone number, etc. are critical pieces of information for every flyer. After all, if you don’t add your contact info, how will your potential client/customer know where to find you to access the product, service or event you’re promoting?
To find out more about how to create a flyer in Word, check out the article below:

Choose the Best Microsoft Word Flyer Template Today
If you're cash strapped and looking for free flyer templates, our list of the top free printable flyer templates for Word is a good place to start. But, if you need to create flyers and other graphic materials regularly, then the Envato Elements may be worth the investment. There you can download unlimited premium Microsoft flyer templates and more for one low monthly fee.
But, if you only need a single template, GraphicRiver is an excellent alternative for high quality premium printable flyer templates for Word.
Head on over to either site today to choose your favourite Microsoft flyer template. Start creating gorgeous flyers that'll catch the eye of your target audience today.

Volunteer templates
Keep your non-profit organized with these professionally designed volunteer templates..

Make the world a better place with free volunteer templates
Use these volunteer templates to keep your charity organized, whether you are involved in a non-profit like an animal shelter, a human rights organization, an environmental group, or other charitable organization. These eye-catching volunteer templates can help you attract more volunteers or donations to your organization. Use volunteer sign-up sheet templates to collect information on your volunteers or use volunteer schedule templates to manage when people can lend a hand. There are even poster and flyer templates to spread the word that your organization needs volunteers and volunteer certificate templates available that you can give to reward people who are helping the cause. All of these volunteer templates are fully customizable. Easily add your own photos, change the font, or edit any of the other design elements using Microsoft Word , Microsoft Designer , Microsoft Forms , or Microsoft PowerPoint , depending on the template you choose. Print these volunteer templates out or download them and share online through social media, on your website, or through email. You can even run social media ads using these templates to find like-minded individuals to join your cause. Thank you for making the world better!
IMAGES
COMMENTS
Flyer templates. Spread the word with a classic flyer. Find a free, customizable flyer design template to take your Word document—based promotional materials to the next level. Whether you're promoting a business, event, or something else entirely, there's a Word template design for your flyer needs. Category.
CSC 110: Introduction to Computers Learning Unit 4: Word Assignment - Flyer Microsoft Word: Create a Flyer For this assignment, you will copy text from this document and paste it into a new Microsoft Word document to create a flyer, as directed in the Assignment Instructions below. Use your own creativity to incorporate the required elements.
In this comprehensive tutorial, learn how to create stunning flyers using Microsoft Word! Whether you're a small business owner, an event organizer, or simpl...
A hassle-free way to create custom, beautiful Word documents. Create useful and inviting templates for resumes, cover letters, cards, flyers, brochures, letters, certificates, and more with no design experience needed. Here's how: 1. Find your perfect Word template. Search documents by type or topic, or take a look around by browsing the catalog.
What To Know. In Windows: File > New > Flyers. Pick a template, and press Create. Right-click a picture, and press Change Picture. Right-click to edit. On a Mac: In New Document, search for "Flyers." Pick a template, and press Create. Edit the flyer, and save or print. This article explains how to use templates in Microsoft Word to create flyers.
Microsoft Word: Flyer Assignment Smart Art - Auto Shapes - Diagrams Part I: Create a Flyer, using the diagram option, about the school describing CLASS. Format the diagram and find colors, borders, and font use YOUR OWN creativity and uniqueness. Using any one of the different diagrams, you will create a poster using the acronym of CLASS.
Open Microsoft Word, confirm you're on the Home tab to the left, and pick More templates on the right. Below the Search box, you should see the Flyers category. Select this to browse all available flyer templates. Alternatively, you can enter a specific type of flyer into the Search bar like "Sale Flyer" or "Event Flyer.".
Step 1: Open Microsoft Word. Open Microsoft Word on your computer and create a new blank document. Starting with a blank document allows you to have a clean slate to design your flyer. This step is straightforward; just double-click on the Word icon on your desktop or search for it in your computer's programs.
Learn how to design a MS Word flyer with this easy tutorial. Follow the steps and tips to create your own flyer in minutes. #msword #flyer #FlyerDesign
Description. Will work with Microsoft Word 2010 & 2013 & 2016. This is a GREAT step by step assignment for students to practice and demonstrate their skills with using Clip Art, Photos, & Tables! They create a Flyer over a clothing brand of their choice, however you can always change what they make the flyer over.
Make sure to get the whole flyer on the screen at once and use a screengrab tool (or CMD + 4 on a Mac) to take a picture of the flyer. To ensure a clean screenshot, make sure no items in the document are selected or you will see those outlines. Conclusion. Creating a flyer in Microsoft Word can be quick and easy.
Pick the right template, customize the design, and make an eye-catching flyer! Open Microsoft Word, then select "New Document.". Click on "Templates" and choose a flyer that fits your needs. Browse categories such as events, promotions, or business. Once you've chosen a template, start customizing it.
If you're already working on a file, click the File tab on the ribbon bar to access this menu. From the File tab, click the New option in the left-hand menu. In the Search for online templates ...
WORD 2007: To make a new flyer from a template, click on "New." Under Microsoft Office Online, find "Flyers" and click on it. You can enter a search term for a specific type of template (e.g. - "open house" or "birthday party.") Or choose the options listed: Event, Marketing, Real Estate or Other Flyers.
Step #1: Download a Suitable Template. Open MS Word. In the left panel, click the New button. In the right panel, type Flyer, and click the search icon. Word will open many pre-built flyer templates. Click a suitable template to use. On the next screen, you will see an image of the template. Click the Create button.
To get started with a template, open a new document, type "Brochure" in the template search box, then press the "Enter" key. Word's large library of brochure templates will appear. Select one that you like. Once selected, a banner that contains information about the template will appear. Read through the information and then select ...
Right click -> Change/correct word. Save a document for the first time. File tab -> Save as -> Browse (or in Recent) -> Name document and click save. Underline text. Highlight text -> Underline Text U. Change the Theme. Design tab -> Themes. Highlight Text.
When your flyer design is complete, print it in-house on your own color printer, send it out for professional printing, or make PDFs to distribute online. Make an amazing flyer or advertisement quickly and easily with our customizable Word flyer templates. Simply download a design, then edit and print.
Customizable pamphlet design templates. Make a lasting impression with an easy-to-read pamphlet. From professional presentation handouts and enumerating your products to start-to-finish event details and playbills, customizable pamphlet templates can flex to fit your next project. Bifold or trifold, find the perfect pamphlet template to start ...
This simple but fun free printable flyer template for Word features a peach background with orange accents and a barbecue grill in one corner of the template. The text is quite minimal and focuses on the title headline of the event, time, date, pace, address and room to RSVP. 16. Financial Business Flyer.
Microsoft Word: Flyer Assignment. Auto Shapes and Diagrams. Part I: Create a Flyer, using the diagram option, about the school describing CLASS. Format the diagram and find colors, borders, and font use YOUR OWN creativity and uniqueness. Using any one of the different diagrams, you will create a poster using the acronym of CLASS.
CSC 105: Computer Essentials Learning Unit 4: Word Assignment - Flyer Microsoft Word: Create a Flyer For this assignment, you will copy text from this document and paste it into a new Microsoft Word document to create a flyer, as directed in the Assignment Instructions below. Use your own creativity to incorporate the required elements.
All of these volunteer templates are fully customizable. Easily add your own photos, change the font, or edit any of the other design elements using Microsoft Word, Microsoft Designer, Microsoft Forms, or Microsoft PowerPoint, depending on the template you choose. Print these volunteer templates out or download them and share online through ...