Inspiration and Tools for Architects
Thanks for signing up!


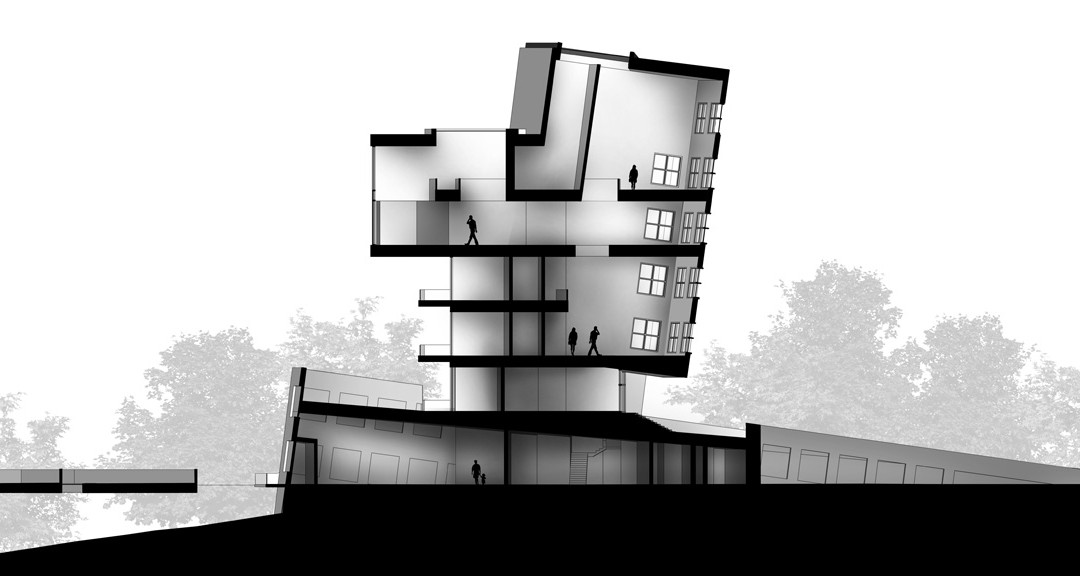
Intricate Views: 9 Tutorials To Improve Your Section Renderings
These videos will help you beef up your design portfolio by teaching you how to convert a simple line drawing of a section into a powerful rendering..
We are thrilled to announce the winners of Architizer's inaugural Vision Awards , the world’s biggest awards program dedicated to the art of architectural representation. Sign up to receive future program updates >
Sections are integral to understanding any architectural scheme. Whether 2D or 3D, they can give an insight into the varying heights within a model, site conditions, function, material use, light mapping and more. Students and professionals have been experimenting with a variety of styles and techniques to create conceptual and realistic sections to best showcase their proposals. Softwares like Illustrator and Photoshop have also made the task easier, especially when paired with 3D modeling applications and rendering assets .
People creating or inspecting design portfolios now expect drawings that are not only accurate but also have a strong visual appeal. Whether it is a blueprint effect, pop-art palette, x-ray layering or a watercolor effect, every technique contributes something different to the composition. Below is a list of videos that show some different types of sections and how to create them digitally.
Dramatic 2D Sections
Using Photoshop, the above video walks viewers through the different steps of converting a simple line drawing of a section into a rich visual that shows material, depth, light, green cover and more. In addition to the main drawing, there are several smaller steps that can not only apply to sections but can also help enrich other 2D drawings. The tutorial also takes care of less important details that might otherwise be overlooked such as staggering shadows on sloped surfaces and recesses.
Simple Perspective Sections
The creator has explained how to take a perspective section from SketchUp into a vector drawing on Illustrator to create a minimal black and white render. This is especially helpful to understand how angled sections can be created for structures with irregular forms. Naudet starts with detailed instructions on how to cut a section in a 3D model and add a reference height for human figures as well as faces for shadows on transparent surfaces. The tutorial then moves to Illustrator where we learn how to layer the base image and the shadows and then add humans, manipulate the site and play with line weights.
Basic Street Sections
Street sections are helpful when it comes to showing road widths, tree heights and compound boundaries. The video above shows how to simply and effectively render a cross-section of a road for larger architecture projects, public space designs or urban planning. It starts with a line drawing and builds on it with silhouettes and vector additions of cars and trees along with labels and dimensions.
Wireframe Sections
This video combines the regular view and the hidden line mode and normal mode views in SketchUp to create a conceptual render in Photoshop. There are also tips on how to vary opacity to enhance depth and manipulate line weights, add subtle textures, and correctly use colored lines instead of black for drawings. The technique is an effective way of moving away from traditional sections to more stylistic drawings without compromising on details or accuracy.
Detailed Perspectives
More focused on the Photoshop rendering than the original SketchUp model, this lengthy video is a must watch for all looking to create detailed and dramatic section renders. It starts with the basics of masking, introducing textures in perspective and adding noise, before moving into light modifications, building contrast and artistic flourishes. The voiceover is also extremely helpful in understanding the importance of each step and how the different tools and commands work.
Cutting Through Landscape
This two-part series shows how to build out a landscape section entirely on photoshop. The first video focuses on a basic 2D section with a water body, vegetation and human activity. This is a method that focuses less on accurate site contours and more on the visual impact of the site. However, it is easy to start with a contour diagram from an AutoCAD drawing or SketchUp model and then follow along with the steps as described in the video. The second video shows how to convert the previously created 2D section into a perspective view, again entirely on Photoshop.
Sketchy Drawings
There is something very charming about hand-rendered drawings and sketches. However, creating multiple drawings by hand is not only more time-consuming but also can leave less room for modifications. The tutorial above shows a simple way of converting a line drawing imported from any 3D modeling software into a section that appears to be rendered by hand. It uses a variety of brush settings such as size, opacity, spacing and jitter to create realistic shading. While the brushes linked in the description are not available anymore, it might be possible to find similar ones on other websites online.
Angled Axonometric
Paired with a great music selection, this video uses an angled section plane in an axonometric SketchUp view to create a colorful section. The initial part of the video focuses on cleaning up the imported drawing, adding fill to the cut portions and tweaking certain line weights. It shows how adding blocks of color can help differentiate programs and also assist in labeling. The drawing is finished off with painted shadows, tree silhouettes and tags for functions.
Puzzle Cuts
A less traditional way of depicting a 3D section is by using a puzzle piece form to cut a section line as opposed to a standard section plane. The video shows how to cut a puzzle piece out of a 3D model in ArchiCAD and clean the model for rendering in Illustrator. The second half focuses on using transparency, adding dotted lines for better understanding, introducing color and more.

Related Content

Beyond Branding: When Retail Design Commissions Invite Architectural Experimentation
Architects are creating elevated and original commercial retail concepts, bringing dedication to com munity, heritage and craftsmanship to the table.

Garden City: Park Projects That Bring Nature Closer to the Metropolis
The best park designs are attuned to their natural surroundings while with statement architectural f eatures that are recreationally accessible to all.

Subscribe to the Architizer Weekly Newsletter
10 Tips for Creating Stunning Architecture Project Presentation
Architectural design projects are the life and soul of architecture school . As a student, you are always working on one, and somehow it becomes what your life is revolving around.
You would give it every possible effort and believe you have done your best, but on jury day, when you see everyone else’s project you could lose a bit of your confidence, not because your project is any less, but because your presentation is lacking.
The architecture project presentation might not be the core of the project, but it surely influences the viewer. It can also be considered an indicator of your artistic skills and sense as a designer.

[irp posts=’151929′]
While you shouldn’t be completely dependable on positive results from a merely eye-catching architecture project presentation, you still need to give an adequate amount of time to properly plan it in a way that communicates your idea best. Your architecture professor might credit you for a creative design regardless of the presentation, but your future client might only see the presentation, so make it a habit, to involve your design skills in all aspects of your project, starting now.
Besides the essential tips and tutorials for photoshop architectural rendering that will definitely improve your board, here, we will give you some basic tips on how to create a Stunning Architecture Project Presentation . So, let’s get started.
Architecture Project Presentation Board Tips
1) size and orientation.

Most of the time your professors restrict you to specific board sizes and the number of boards. If that is the case then you need to confirm if your boards should be presented in Landscape or Portrait orientation. You, also, need to decide if you will be presenting your board side by side as one big board, one poster of equivalent size, or as separate boards that come in sequence.

Now, that you have a base to work on you need to start planning the layout of your boards or poster:
- If you are presenting hand drawings then you can do prior planning on one or more A4 paper sheets for example. Try to make an accurate estimation of the space needed per each drawing and the buffering space you would like to leave around each.

- If you will be presenting CAD drawings, then this might be easier. You can experiment with the actual drawings on CAD Layout or Photoshop if you will be rendering your project digitally.
- You can use a grid system to organize your drawings. Decide on a unit width, for example, 6cm, then use its multiples to create unit areas to contain your drawings, like for instance, 12cm for outer frame buffering, 36cm for main drawings and so.
Do This Or that! Here is an example!
3) placement and zoning.

Think of the way you would like the viewers to circulate through your presentation, what you would like them to see first, how they would best understand your project. For example, you may start by brief site analysis, then move to the concept statement and its illustrative sketches if needed.
- If your concept is form-based you may need to show the form first, before the plan, then move to the plan to reveal how the form has functionally worked out.
- If your concept is in the plan itself, then you may move directly to the plan and conclude with the rendered exterior form as usual.
Drawing and Rendering Tips
4) background.

Dark Background
It is called “background” for a reason. It should be a platform to feature your drawings as the main focus, clear of any distractions. Some students use faded renderings of their own projects as background, but this can be seriously diverting. White backgrounds are best, as they show the true colors of your project.
Some opt to use a black background to stand out, however, that doesn’t usually turn out so well. It may cause halation and strain for sensitive eyes.

Black and white presentation
There are many ways you can render your projects, choose the one you excel at and shows your project best.
- There is the Black & White or Greyscale presentation where you only show lines with various thicknesses, in addition to shade and shadow.
- There is the greyscale presentation with an element of color where you would choose one bright color, for example, green for landscape and greenery, to contrast with the, generally, achromatic drawings.
- One color might become two colors revealing different materials like wood or bricks and glass for example.

Presentation with a Color Scheme on Greyscale
All, these previous techniques would work out fine if colors are not the main focus in your project, however, if there is an idea behind your color scheme or the used materials, or there are many details that will go lost in greyscale, then there is no way out.
You need to fully color or at least broaden the color palette for your presentation.

Colored Presentation
The manual achromatic presentation can be via graphic pencils and ink, and the colored elements can be executed using watercolor, markers, brush pens, or pastels. For digital presentations, you can use Adobe Photoshop as the most commonly used tool. You can even mimic the aesthetic of the manual presentation in Photoshop using downloadable brushes and a mix of effects.
6) Visual Hierarchy

Black and White Contrast Color
What is your strongest point, the highlight of your project? Grab the attention from far away with that. There are many ways to grab the attention of a specific drawing, using color or size. For example, if the main idea is in your cross-section, you can present it on large scale with full-hue colors, against black and white plan drawings. That is mixing between two of the color presentation techniques mentioned in the previous point to get emphasis by contrast.
General Tips
7) Minimize text on your presentation board. Write a short and concise concept statement and add a very brief explanation, if needed. Don’t waste your time composing elongated descriptive text because no one will read it.
8) Replace words, whenever possible, with simple illustrative sketches and figures. After all, a picture is worth a thousand words. You may use colors and keys to further clarify your illustrations.

9) Use a suitable font for your title and text and, preferably, don’t use more than one font type per project. You can vary between the title, the concept statement, and the labeling by size. Sans Serif fonts like Century Gothic and Helvetica may be good for headlines; their slick minimalism befits modern high-tech designs.

10) Finally, don’t overdo it.
- Don’t pack your boards with drawings and text at every corner. Leave some breathing space but not too much, that it would look like a) you couldn’t finish your work, b) you didn’t well plan your boards or c) you haven’t worked hard enough.
- Don’t overuse colors to the extent that they would become a distraction but also don’t make your presentation too light and faded, or it might exhaust the eyes of the viewer and give an impression of weak effort.

Tags: Architecture Drawing Architecture presentation Architecture Project Presentation Presentation Presentation Tutorials Project Presentation Simple Projects Architecture

University of Melbourne Student Pavilion | KoningEizenberg Architecture

Meadow House Maasland | JURY!

Cascada de Luz House | Studio Saxe

Hyparschale Building Hall – Conversion Refurbishment and Conservation | gmp Architects
- Concept Designs
- Apartment Interiors
- Color Filter
****************************
**************************** Products mentioned: Art Maker Drawing Masterclass Kit (portrait) : https://amzn.to/2V6j1T3 Moleskine Folio Sketch Book A4 : https://amzn.to/2RfaaiX Moleskine Sketchbook : https://amzn.to/2A95AJ9 Derwent 2302206 Graphik Line Maker Drawing Pens, Black, Pack of 6: https://amzn.to/2RezFAV Derwent Graphik Line Maker – Graphite, Pack of 3: https://amzn.to/2A6sWiP Derwent 2302-208 Graphik Line Maker – Sepia, Pack of 3: https://amzn.to/2BBnKTU Derwent 2302207 Graphik Line Maker Drawing Pens – Black, Pack of 3: https://amzn.to/2RcZYrc Ryman Sketch Book A4 – Color: Black: https://amzn.to/2R6m5Qf Artcare A3 Synthetic Material Academy Case, Black: https://amzn.to/2BzD1Vi Mapac Quartz Portfolio A3: https://amzn.to/2AeW3Ar ArtWay – Portfolio Carry Case A3: https://amzn.to/2Cv3BAI Royal & Langnickel RFOLIO-46 A3 Soft Nylon Portfolio Case: https://amzn.to/2AeAujx
Filming Gear: Camera: https://goo.gl/Wsd2d3 Tripod: https://goo.gl/ws5L4t Mic: https://goo.gl/fyh2FR
Supplies I use: A4 Marker Pad : https://goo.gl/W8QbuP A4 Sketchbook : https://goo.gl/8n4aMM A4 Sketchbook : https://goo.gl/U7NYqd A4 Sketchbook Bundle : https://goo.gl/CPonXa Architectural Templates: https://goo.gl/aGwUEt Scale ruler: https://goo.gl/YmC1CV Stabilo Fine point: https://goo.gl/63mz9G Drawing pens: https://goo.gl/JE4zR1 Derwent Graphik: https://goo.gl/rrtBjG Magicdo Sketch: https://goo.gl/a47hHR Derwent Sketching Pencils: https://goo.gl/ZNLyXQ Pentel Sign Pen: https://goo.gl/fPE3tV Craft Knife: https://goo.gl/6u9A7s Touch Markers: https://goo.gl/AQZ3S2 Sharpie: https://goo.gl/Z6adL9 Pilot V7 Hi-techpoint: https://goo.gl/i7BEN9 Winsor and Newton Water colour: https://goo.gl/879SoE Water Colour brush: https://goo.gl/EK2bBx Faber Castle 24 Pastel Pencil Colours: https://goo.gl/wCzTef Derwent Pencil wrap: https://goo.gl/6P2F2y Windsor Newton Markers: https://goo.gl/XAMN8U Grey Copic Markers: https://goo.gl/HoQPtV A4 tracing paper: https://goo.gl/AEjMPR Roll of tracing: https://goo.gl/hdrhiu Masking Tape: https://goo.gl/zx8J8o
Watch my previous videos:
Subscribe to my channel http://www.youtube.com/channel/UC8kmK7NIn7MY5xZFxDA5oGw?sub_confirmation=1
Get socialistic *************************** Twitter: https://twitter.com/surviving_arch Instagram: https://www.instagram.com/survivingarchitecture/ Facebook: https://www.facebook.com/survivingarchitecture/
Music: *************************** Music by www.bensound.com FTC // This video is not sponsored, some links may be affiliate links, all opinions are my own!
Become my Patreon: https://bit.ly/2nS9X8a source

We will contact you soon.
- Surviving Architecture
Please login to bookmark
Username or Email Address
Remember Me
RECOMMENDED
- Photoshop Plans
- Photoshop Sections
- Photoshop Elevations
- Photoshop Iso & Axonometrics
- Photoshop Collages
- Photoshop Post Processing
Steel and Glass building Concept 645
Timber building concept 161, pavilion building concept 2798, pavilion building concept 3945, illustrating an architectural plan in photoshop – narrated full tutorial – realtime.
- Terms of Service
- Privacy Policy
Popular Categories
- Concept Designs 8639
- Architecture 8133
- Lectures 8131
- Interior Concept Designs 7195
- Art & Culture 5910
- Pavilions 4600
© DezignArk
Quick Sections
by Alex Hogrefe | Dec 13, 2010 | Fundamentals | 15 comments
When I don’t have time to fully render sections in Kerkythea due to time constraints, I fall back on this method to get me out of jams. In fact, I used this method to create sections for my final thesis project and finished all three of them in an afternoon. This method provides not only interior spatial information by the section cut itself, but also the architects intent in lighting the interior spaces.
When using this technique, it’s important to remember which direction the light is coming from and how it will bounce off of different surfaces. I treat the light more like a cloudy day, so less harsh shadow lines and more diffused, soft shadows.
Scaling: This video doesn’t explain scaling, but typically, I would also export the SU section into CAD. From there, I would plot the file as a PDF to a predetermined scale then open the PDF file in Photoshop. I would then resize the rendered section to the size of the CAD PDF.
Line work: In the video, the section is poched in Photoshop. For cleaner line work, there are ways to poche in SU, and obviously in Illustrator. Personally, I don’t think this is necessary. If done correctly and at a high enough resolution in Photoshop, the line work will look more than sharp enough. On the other hand, in terms of editing, line work in Photoshop probably is not the way to go. More on this later.

Oiginal exported Sketchup Model

Final image after post processing

Thesis Sections
15 Comments
Another great tutorial… Thanks Alex!
Brilliant! Thank you!
LAD! Cracking effort. Thanks a lot.
Very nice tutorial.! learned a lot. easier would be though if there was sound 🙂 And a tip for photoshop. If you control click with polugonal lasso tool you immidiatly close the selection without having to lookf for the beginning :.
Men this is just amaizing like all ur post!!!
Thanks for all the complements and thanks to Elmar's Polygonal lasso tool tip.
Great tutorials! I just found your website linked on a Danish blog.
I'm an architecture student myself. And now I'm wondering… where did you get the images of the people and trees from? Do you (or anyone else) know a good place to get these?
I know that it is rather easy to make silhouettes of people, but cutting loose trees is quite difficult! Help is much appreciated!!
Rasmus, I have a library of trees and people that I have used throughout architecture school. Check out vyonyx for cut out people (link on the right side of this website). Im not sure about free cutout trees on the web though.
I second the recommendation of Vyonyx – they also have great cut out trees.
Thanks a lot Alex for cutout people and trees on vyonyx ! I looked for this kind of files for a while !
Don't thank me, thank Vyonyx haha.
Temperature growing, much less clothes! His footwear don't have to say, obviously, need to find a set of relatively light, they're not going to feel hot to put on the footwear myself! So cyber monday bailey button triplet ugg purchase provide us with surprises.UGG snow boots pure made of woll brand. UGG its wealthy, soft, casual obtain a good European favorite stars. ugg bailey button triplet may be the winter you may enjoy a warm and comfy was extra fine. Additionally to males and ladies split Uggs, sandals, and footwear. UGG bag series also introduced this season, to feel happy with our prime lead sheep in to the world. uggs are actually properly protected in the winter months.uggs it's not always affluence of this anybody apprehend techniques to provide out mark by approach to your ugg bailey button triplet boots in accession to broil the yearly alone if it's drenched. Grant aggregate from the respected footwear, possess a chance to appear for your yearly correctly!The Uggs is really a right option for us particularly the ugg bailey button triplet sale have domain the boot's market because the this past year by its design.The gown with snow boots, but typically the most popular winter! Dress exactly the same paragraph, will also be appropriate with pale pink snow boots. Lovely warm pink, could make you instantly by age ten years old.
herve leger is a of france,we should know this already,which is famous from the fashionable designes, various styles with top quality. All make by special and different material with Rayon, Nylon material, Spandex.It's have lots styles from your bcbg max azria dresses sale collections ,for example: bustier dress are inspired by previous designs and outdoors influences, because its designes without strap, using the bust top only,you don't need to make more adornments, the sexy already showing directly, that's why it's welcome by all women in each and every periods of favor.women that are different, however the feel of the sensational look aren't able to visit wrong, a shoulder. the primary highlight Herve Leger dress is the matter that it presents a peek at the skin better versus exactly the same time use in the coquettish enough to determine you really feel at ease. This dress combines the avant-garde stylishly outfitted women in elegant and superior features.The Herve Leger Single Strap , a brandname from france, a way country, everyone know this that simply because they possess the fashion showing each year in seasons, espeically the paris.The herve leger is known for its fashion designes,fand various styles. You might know exactly why is popular every summer time simply because its styles and quality.
Disse dage fleste af husdyr er kl?dt op i det bedste af det t?j, der udelukkende er beregnet til dem. P Canada Goose Jakke fleste af p gange disse t?j er ogs? designet af etablerede designere som Christian Audigier eller Emma Rose. Og disse modet?j kommer komplet mediterranean hund modetilbeh?r. Det betyder, at du ikke beh?ver at blive begr?nset til blot living room hund t?j, Canada Goose Jakker males du kan fuldf?re din pooch designer look mediterranean andet tilbeh?r. I tilf?lde af at du er bekymret for, at din hund ikke er velegnet til det barske vejrforhold s? igen, du kan f? noget t?j, der er beregnet til at beskytte din hund fra det ekstreme klima.Sletning af data kanal skift i ASN, CSN skiftes til standby og tilbage mesh scenen.3, WiMAX centrale netv?rk adgang teknologi i datasti af flere typiske scenarier Canada Goose Original Lower Parka 3,1 indledende Canada Goose Outlet service flow og etablering af datakanaler Stage i netv?rket adgang, v?re brugere QoSProfile canada goose jakker downloades til SFA fra AAA. MS efter afslutningen af ??adgang til autentificering, ASN GW i godkenderen Canada Goose Danmark i A udl?ser About hund t?j A K?ledyr Artikel Husk der plejede at v?re en tid, hvor vores k?ledyr ville ikke b?re noget t?
Christmas gift <h1> coach bags outlet </h1> The most fashionable cheap <h1> coach outlet online </h1> Christmas Specials <h1> authentic nfl jerseys </h1> Beautiful and unique <h1> coach outlet online </h1> 2011 most unique design <h1> wholesale designer bags </h1> Buy want to buy products <h1> coach outlet store online </h1> Professional design <h1> coach handbags on sale </h1> Single product sales <h1> coach bags on sale </h1> Cheap and good-looking <h1> coach outlet store </h1> With top design <h1> authentic jerseys suppliers </h1> Male friend love <h1> nfl jerseys from china </h1> Very glad that you buy
Trackbacks/Pingbacks
- Sections Via Zorro 2 | Visualizing Architecture - […] showing how to render a section only using a Sketchup image and Photoshop which can be seen HERE. That…

- Break Down (82)
- Final Moves (11)
- Fundamentals (31)
- Graphic Design (3)
- Over Time (23)
- Portfolio Vol. 2 (7)
- Portfolio Vol. 3 (24)
- Portfolio Vol. 4 (36)
- Portfolio Vol. 5 (34)
- Portfolio Vol. 6 (22)
- Project 01 Long Wharf (11)
- Project 02 Cultural Center (8)
- Project 03 Crossroads Pavilion (11)
- Project 04 Cliff Retreat (8)
- Project 05 Research Lab (7)
- Project 06 Philly Bridge (9)
- Project 07 Desert Villa (9)
- Project 08 Mountain Lodge (7)
- Project 09 Porter Square (10)
- Project 10 Prairie Office (8)
- Project 11 MIT Hub (6)
- Project 12 Summerfest (3)
- Styles / Effects (36)
- Uncategorized (84)

- AutoCAD Tips
- Hand Drafting
- Hand Rendering
- Photoshop Tips
- Rendering Tips
- SketchUp Tips
- Urban Design
- Useful Websites
June 24, 2012
Section rendering: sketchup and photoshop.
| Section Rendering from Video by |
- Export section cut from Sketchup
- Open in Photoshop, color section cut
- Shade interior
- Add Landscape
Additional Information

No comments:
Post a comment.

How to create a perspective section in Photoshop
In this video I want to show you how to create this perspective section effect using mostly, photoshop. This is part of our Master Sections course which we released a few years ago and I love this technique so much that I wanted to create a video around it. In the course we also see how to create these other two sections but more on that later, lets start.
First, references, we always start with reference images, and for this section, I looked a lot at the Renzo Piano style sections. Where you can see the blueprint style where there is a blue background, and white linework. But also, there is a very technical feeling to the section, it-s also very informative. It has dimensions as well as important information about the building.
Access the Master Sections course with a 20% discount! Click here " "
Create a section in Sketchup
Even though the majority of this image is going to be done entirely in photoshop, we do need a 3d modeling program to export our base section and our base images. In this case I am working on SketchUp and AutoCAD, but if you use other 3d modeling programs like Revit or rhino you can also do the same. If you already have this part, you can skip to the section where we start in photoshop.
In SketchUp I am going to create a section in a place that is visually interesting and shows the most important parts of the building. In my case, I decided to create a section in this area right here. I am going to put the view in parallel projection, and export the section as a DWG file.
Technical details in AutoCAD
Now I am going to add all of the technical details inside of AutoCAD. Since this is something the majority of you probably know how to do if you are watching a video like this, I just want to break down the steps I did here. First Ill start by organizing the main section cut line, which is the most important line of our section. I will clean it up and make sure the lineweight is thick so the cut is visible.
I also added some detail on the slab structure, detail that I did not have in my 3d model but it was easy to add in autocad. Similarly, I adjusted the lineweights of the drawings, and I will leave the thinnest lineweights to the elements that are farthest from the section line, and they will increase in lineweight when they get closer.
Next I will start to add some furniture. You can use the furniture you have at hand, or you can also download some furniture blocks from our resource library. Here we imported some desks, lamps, chairs, etc. Afterwards add the technical details, like axis, dimensions, floor numbers, etc.
And finally we just export this plan as a pdf and thats it! This is our first important part, remember that since this section is a mix of technical information along with a 3d rendered feel, we need to have a well done technical plan. Now lets create the second part, which is the 3d extrusion from the plan, just like it popped out.
Export Images from Sketchup
Now lets go back into our 3d modeling program, here I also want to speed up the process and show you the basic moves I did inside of SketchUp. First, I imported the CAD drawing onto SketchUp and started extruding the slabs and the walls. You might be wondering, steven, you already have a 3d model, why don't you use it? Well for this section I really wanted to work with a clean 3d model and I thought this was an easier option. But if your working on a program like Revit and your 3d model is well detailed, you can just use the section box tool and export the 3d model as a section.
This is the model I created after extruding it. If I show you the two three 3d models, the one I had originally with the section, and the one I created from my technical plan, you can see the difference. After I have a 3d model of my section, I will create a plane on the background and place it beneath my 3d model. I will click on the section and click on align view.
From this I will export three different views into photoshop. And these views are very important. For the first style I will go turn of the edges, put the section fill in white, section lines in white as well and the background in white. Now lets turn on the shadows adjust the shadows and save it as a scene. For the second scene put the background in black, turn off the shadows, and call this object shadows. And save it as a scene.
For the third style change the front color to black, section lines and fill to black and the background to white. Save this scene. Likewise, lets export these scenes as PNG file in a high resolution.
Photoshop Import
Then, lets open photoshop and import our files. Lets create a new file I already have one created where i first imported my plans from AutoCAD and placed a background color. I have two plans that I exported, one has the architecture and the other one has the dimensions. For my blue background this is the blue that I used for this image.
Now create a levels adjustment layer, make sure you group these DWG files and with a levels adjustment tool turn it all white. Now since I want to give more depth to the image, with the lasso tool I will select the areas that are farthest away from the section and fill them with a black color, with a very low opacity, something like this. This is what it looks like before, and after. Of course lets group our layers, we should have the base, shadows and lines.
Import Images from SKP to PS
Now lets import the images we exported from SketchUp. First we are going to import our object map, then the sun shadows and then the object shadows. I am going to group them all and lower the opacity of the group, with this I can press ctrl t and adjust the scale and placement and align it to our technical plan. Make sure this is correct!
The 3d Effect
Lets go to our section object map layer, lets change the color to white. Lets go to image, adjustments, levels and put it all white in the output levels. Make sure these are all smart objects, so we can go back at ay time. Meanwhile, lets go to our object shadows layer, we are going to turn it on, and using our object map, I am going to ctrl click on top of the layer and this will create my selection. Now I will go to the mask tool, and this will hide everything else on the layer. Now I will switch the blending mode to multiply. And here we have the first base shadows for our 3d image, although it looks cool, we have a long way to go!
And for the sun shadows I will use the same object map contour by using ctrl click and hide the outer part of the image. Here we have the shadows applied to our image. Lets set this to normal and turn down the opacity. Next, lets duplicate the sun shadows layer, and delete the mask. Lets turn off all the other layers for now, and with the magic wand tool and selecting the color range we are going to select only the shadows. As soon as we have our selection I am going to go to the 2d group, I will create a new layer in the shadows folder, and fill it with a black color.
Now lets duplicate this shadow layer, and on the first one I am going to create a gaussian blur (179) and diffuse the shadows so it has a nice blurry effect, And lets adjust the opacity (60%)accordingly. And for the second one we are also going to apply a gaussian blur but less this time (blur 81 opacity 60) This is starting to look really cool, right? Now this image needs more shadows that makes this look more realistic and have that clay rendered effect.
So I am going to go to the section object map, right click on the layer and turn on the drop shadow effect, lower the opacity, increase the distance and adjust the angle. If I turn off and on you can see the impact of these shadows. There are some areas where we have to add some shadows in a manual manner. For example for the bottom of the slabs I will create some shadows. I will use the lasso tool to select the bottom of the slabs, now create a new layer, paint it all black, and lower the opacity to around 15%. Next, I’m going to manually adjust some shadows that could be emphasized much more. So with the lasso tool just select the bottom of the slabs and pain in a soft shadow.
Final Details
Now our building looks like it popped out of the drawing, now, lets create some contact shadows that are just small levels of detail to give more realism. Here we just create a new layer, select a soft brush, black color and a low opacity, and we are going to paint it softly where the building meets the paper. This is a very artistic part of the process where we just paint very soft shadows and it may take you some time, but you have to be patient, this is the key to this image, the shadows., as soon as you have all of these your drawing should look something like this.
This is how it looks before the contact shadows, and after. Amazing, right? Next, lets add some people and furniture to add more detail to our drawing.
First I am going to add all of the people to our drawing and place them in the same scale. You can get some people for free in the classic page pimp my drawing, or you can also visit our resource library and download different types of cutouts and illustrations. After I adjusted the scale I will place them all around the model.
I will select half of the people, and place them in a group. Next I will mask the people out and then with a levels adjustment layer make them all white, and lower the group opacity. This will make them feel like they are part of the 2d drawing. For the other half of the people I am going to create a different group, and also turn them all white, I will merge the group and add a drop shadow to the people, to make them stand out. This will have an effect of 3d maquette people that also popped out of the drawing and it gives a sense of depth to the image.
And we e are going to do the same process but with our furniture from autocad, We are going to import them adjust the scale and place them throughout our whole drawing. Details like people and furniture just add that extra level of detail that makes this image so much better. I spent a bit more time adding some extra details and this is how the section came out.
Conclusion
Now as I said at the start, this is just one of three styles of sections I teach in my master sections course that has had hundreds of students through the years. If you are interested in taking this course, learning in detail how to create this section, and also a perspective section and a more conceptual type section you can access the course through this link.
Browse more articles
8 Photoshop Architectural Rendering Tips Every Architect Should Know
By Tata Rossi 20 days ago, Photoshop Tips

Photoshop architectural rendering is a technique used to create 2D and 3D images of a future building. The main idea behind this process is to produce a lifelike picture of how a property will look before it is actually built.
Top 8 Photoshop Architectural Rendering Tips
Photoshop has long established as a top-notch instrument for architects involved in different creative spheres. I have prepared some tips on Photoshop architecture rendering, which you can use to make the process streamlined and resultative.
1. Keep Your Layers Organized
Though it is easier to work with a smaller number of layers, the rendering procedure involves handling multiple files, which can end up being chaotic and confusing. The best way out here is to arrange them in folders based on the content.
With thematic groups, you can manipulate multiple files as a single line, so the navigation process will be a breeze. Another advantage of this method is the possibility to apply masks to an entire group, which makes rendering in Photoshop intuitive. You should also learn how to merge layers in Photoshop to keep all layers well organized.
While making folders, you can use the following criteria:
- Base Files (line work, base rendering, Alpha, etc.)
- Background (surrounding site buildings, landscapes, etc.)
- Ground Plane (roads, sidewalk, grass territories, etc.)
- Interiors (people, furniture, and lights)
- Plants, People, and Transport (each category gets its own group folder.)
- Visual Effects (color overlays, sun glare, fog, and overall adjustments, etc.)
- HDR/Plugins
2. Use Smart Objects
If you have ever tried adding a photo to a canvas and scaling it down, you have probably noticed a severe quality decrease. You can easily solve this problem by using Smart Objects. They are indispensable tools for Photoshop architectural rendering, as they allow resizing objects, rotating and performing other changes without affecting the original quality unlike what you get with rasterized pictures.
You may also want to use Smart Objects if you need to preserve manipulations made in Free Transform. This means you can alter or totally delete the changes made regardless of their sequence. You can also easily duplicate Smart Objects.
3. Save Time with Hotkeys
While handling renders for Photoshop, you constantly have to switch from one menu to another, adjust settings, and look for different tools. This is a time-consuming process, so it makes sense to speed it up. The most efficient way to do so is to learn essential Photoshop keyboard shortcuts .
Using them, you can immediately activate particular functions and instruments. Above, I have prepared a list of frequently-used hotkeys that are bound to make Ps architectural rendering as quick as possible.
4. Utilize Non-Destructive Workflow
Regardless of the project you work on, it is important to be in full control over the changes made and have the possibility to jump from one step to another in a fast way. If that is something you are striving for, you need to stick to “non-destructive” methods while editing layers. This means you can edit a picture and return to alterations whenever needed.
Masking in Photoshop is a core of non-destructive image editing. Using masks, you can hide or mask parts of a layer. This resembles the effect of erasing, but the main difference here is that you can get rid of a mask or bring it back to the area of a layer that was erased.
Besides masks, you can use adjustment layers. They stick to non-destructive editing principles and allow you to customize layers, contrast, etc. This way you can make changes to several layers simultaneously and reverse the adjustments when needed.
5. Sample Colors Outside Photoshop
Newbie designers, who disregard Photoshop tutorials often import photos to the software just to perform color sampling, which makes Photoshop architectural rendering so much longer.
You can make this adjustment faster by using the Eyedropper. Click on it and hold the left mouse button; then move the tool to the color point of an object. This can be an opened image, a desktop picture, a web page, etc.
6. Achieve Consistent Colors
In case your project consists of numerous images, you may face problems trying to keep a consistent color scheme across all pictures. Fortunately, there is an efficient method to cope with the task – choose Image > Adjustments > Match Color. That’s it.
If you go this path, the program reads the color specs of a picture and uses the info while processing the rest of the images. You can use this approach while adjusting color intensity, fade, and luminance.
7. Add Cutouts
While working with renders Photoshop, you have to be very accurate and make them look absolutely realistic. Usually, designers add people, plants, everyday objects, which are available on free 3D models sites . Look through the PNG files and choose a suitable cutout.
Then adjust it so that it perfectly matches the scene. Once you are done with cutout inserting, learn how to add a drop shadow in Photoshop to create a lifelike image.
The simplest method to add a shadow is to make a copy of the added cutout. Be mindful about light direction not to violate the laws of physics. You can take advantage of the Gaussian Blur filter to make some areas blurred or add a layer mask for a fading out effect.
8. Protect Your Work
Photoshop architecture rendering doesn’t end up with a creative part, there are some precautionary measures you have to take in order to protect your creations. It happens that clients may use finished projects for different purposes without your permission. That’s why, you need to use all possible methods to indicate your authorship.
Many designers decide on making a watermark in Photoshop , but this isn’t a 100% guarantee your works are safe. A better idea is to use a password, so that no one can remove it to print a “clean” picture. You just need to save your files as PDFs and type in a password in the Security > Permissions section.
Photoshop Architectural Rendering Methods
Nowadays many visualization algorithms have been developed for making our life considerably easier. To make things even more complicated, existing paid and free rendering software can use several algorithms at a time to obtain the final image. Thus, you should be aware of their combinability too. Let`s consider the simplest ones.
Light Tracing
The first comes light tracing. The laborious tracing of each light ray in a scene is totally impractical and takes unacceptably much time. Even tracing a small number of rays, sufficient to get an image, takes a huge amount of time if no approximation or sampling is applied.
Because of this, four groups of methods were developed, more effective than simulating all the rays of light that illuminate the necessary interior scene.
Rasterization
Rasterization together with the scanning of lines is a common thing for applying Photoshop for architectural rendering. Visualization is carried out by projecting the objects on the screen without considering the perspective effect on the observer, to be more precise a customer.
Begin by importing your architectural render, then use Photoshop's rasterization tools to refine details and textures, ensuring a polished and realistic outcome. Leverage layer masks to precisely control which areas undergo rasterization, maintaining flexibility in design adjustments. Fine-tune lighting effects and shadows with Photoshop's brushes and blending modes, adding depth to your render. Utilize filters for nuanced texture applications, emphasizing materials and architectural elements.
Ray Casting
Then we will consider ray casting. The scene is seen as an observable from a certain point. From the point of observation, rays are directed to the items of the scene, as with their appearance the color of the pixel on the two-dimensional screen is determined.
In this case, the rays stop their propagation, unlike the method of reverse tracing, when they reach any object of the scene or its background.
It is possible to use some very simple ways of adding optical effects. The perspective effect is obtained naturally in the case when the light rays are thrown at an angle depending on the position of the pixel on the screen and the maximum viewing angle of the camera.
In the realm of architectural rendering, selecting the best camera for architectural photography becomes crucial. The camera's ability to capture accurate perspectives and intricate details significantly influences the quality of the rendered images. Opting for the right camera enhances the effectiveness of ray casting, ensuring that the visualizations accurately represent the architectural scene from the chosen point of observation.
Ray Tracing
Ray tracing is similar to the method of throwing rays. From the point of observation, rays are directed to the objects of the scene, with the help of which the color of the pixel on the two-dimensional screen is determined.
But the rays do not stop their propagation, but they are divided into three ray-components, each contributes to the color of the pixel on a two-dimensional screen: reflected, shadowed and refracted.
The number of such components determines the depth of the trace and affects the quality and photorealism of the image. Due to its conceptual features, the method makes it possible to obtain very photorealistic images, however, because of the high resource consumption, the visualization process takes considerable time.
Path Tracing
Path tracing uses a similar to ray tracing principle, but this method is quite approximate to the physical laws of light propagation. Also it is the most resource-intensive. Advanced software usually combines several techniques to obtain a sufficient high-quality and photorealistic image for acceptable computational resource costs.
Still method description is a good and useful thing, but for us it is much more convenient to see than to read. Thus, in the following video, which is a Photoshop architectural rendering tutorial, you will see all described methods in action. You will understand with your own eyes how they influence the surface of the picture.
- Architectural rendering tips
- Popular methods

- Video Editing Services
- Virtual Staging Services
- Outsource Photo Editing
- Retouching Tips
- Photo Editing Freebies
- Free Raw Images for Retouching
- Free Photoshop Actions
- Free Lightroom Presets
- Affiliate Program
- Privacy Policy
- Cookie Policy

- Hispanoamérica
- Work at ArchDaily
- Terms of Use
- Privacy Policy
- Cookie Policy
Tutorials for Post Production Editing of Architecture Drawings in Photoshop

- Written by Fabian Dejtiar | Translated by Becky Quintal
- Published on June 29, 2018
If you are trying to approach the representation of architecture through postproduction in Photoshop , the YouTube channel Show It Better can be very useful. The following tutorials allow you to maximize the effectiveness of photoshop by providing both technical and visual tips.
Here we have selected examples that address axonometric representation, plans, sections, elevations, diagrams, and others.
We hope you enjoy the following tutorials. What other kinds of drawing tips would you like to see?
Axonometric Drawings
"post-digital" drawings.
See more examples of representation on the Show it Better Instagram account .

- Sustainability
世界上最受欢迎的建筑网站现已推出你的母语版本!
想浏览archdaily中国吗, you've started following your first account, did you know.
You'll now receive updates based on what you follow! Personalize your stream and start following your favorite authors, offices and users.
- Skip to secondary menu
- Skip to content
- Skip to primary sidebar
tonytextures.com
graphics for architectural visualization
How to Create a Quick Architecture Section Drawing in Sketchup and Photoshop

In this beginner tutorial we want to give you an insight how to create quickly a architecture section drawing in Sketchup for your next and add some visual elements for e.g. a architecture presentation. We use a quite simple model here and go quickly through the steps to give you an idea about the general workflow. We also use and link to various of our free archi-viz graphics so do not miss to get through the steps and grow your own library of graphics for architecture visualization on the side 🙂 Enjoy!
2D Architecture Section Drawing – Enhancing the visual quality
The beauty of architecture lies in three-dimensionality. A plan may excite an architect but not always the client. Two-dimensional representations of architectural sectional drawings have a high chance to be misinterpreted. The greatest architectural firms on earth always emphasize on the simplicity and elegance of presentation drawings as the clients want the end product, not the raw ones. In student life, architects get much less time to create fabulous graphics. A calculative approach of time-budgeting and the knowledge of effective shortcuts is the only key to click the aesthetic-cravings of the judges. It’s beneficial for the practicing architects too, as sometimes, clients want very quick visualizations.
So here is my cheat-sheet of creating a quick yet artistic sectional drawing in a real short time.
THINGS YOU NEED TO PREPARE BEFOREHAND:
- An AutoCAD plan of your building
- Raw .png vector images of the objects (Human figures, trees cars, kites)
For this tutorial we also use the free textures from our Open ArchiVIZ Pack and other tonytextures ressources that are linked below. Grab the stuff for free for your next architecture visualization project or for this tutorial!
Import the AutoCAD Architectural drawing in Sketchup
First we need to import our 2d AutoCAD drawing to Sketchup. Follow these steps:

2) Now extrude it accordingly to create your model.
3) Always remember to GROUP the objects.
4) Always MAKE COMPONENT of the repetitive elements

So, here is my model after these steps. It should be an art gallery – I know a quite simple model so far, but for this tutorial it is rather important to explain the simple steps and therefore this example will do the job…

Use “Styles” in Sketchup to create the “Sketch Look”
- At first, unhide the hidden planes from Edit<Unhide<Unhide all
- Go to Window<Styles
- Select a style which contains simpler lines. I’ve used Straight Line 04 Px here, but you should explore a lot to get the one you love!

Define the Section in the 3D Model
- Select Tools<Section Plane
- Place the plane on the surface of your desired section
- It will be initial cutout. However, you can move the plane by selecting it with Move tool to penetrate through a deeper section.
Create a Architecture Section View
- Click the Camera button and check Parallel Projection
- Click the view you want. (Front, rear, up or down; from where the generated section is visible.
- Select File <Export<2D Graphic
- Save it as a .jpeg
- Now you’ll get a shot of your section. Just keep in mind to zoom in for a maximum visualization.

Here, we’ve actually got the basic section drawing to work on.
Our final image that we want to use in Photoshop looks like this now:

Let’s proceed with Adobe Photoshop to quickly add some graphics and a background image.
Import Sketchup Section Rendering in Photoshop
Now it’s time to give it a greater shot.
1) Open the previously saved jpeg file

2) Delete its background using Magic Eraser tool . Simply click on the white background with the eraser.
3) Save the prepared image in .png mode
Next we open our new workspace:
- Open your canvas from File<New
- Customize it as per your specifications. I’ve chosen an A4 paper from the international paper option and selected a resolution of 300 pixels/inch. Choose CMYK color setting if you want better printing.
- Now import the drawing on your awaiting canvas through File<Place Don’t resize it, the original one is a better fit for this high resolution.

Next we want to select and fill some general areas like the ground.

- At first, you need to mark the chopped ground-line. Work with the Rectangular Marquee tool, select the area beneath your section.
- Add a new layer. Rename it for your reference.
- Now right click on the selected area, select Fill and choose a color, preferably black (or if you want it to bleed out of the cut, simply choose red!!)
- Now fill out the rest of the cutout walls and floor planes. You have two alternatives.
- Select the basic sectional drawing layer, use the Magic Wand Tool on the cut area and see the magic. Repeat filling.
- Use the Rectangular Marquee Tool and draw the cuts, basically, repeat no. 3.
- Don’t forget to create a new layer for each fill. It leaves a flexibility to edit afterward without any major change in the drawing.
- Select the repetitive layers all together and convert to smart object. You can copy it as a singular object from now on.
Select the ground, stairs, the walls and the ceiling and fill it with e.g. black:

Adding Cutout Trees to the Architecture Section
Next I want to add some 2D trees in my section view. I often like to use hand-drawn trees as they have a special look. You can find some hand-drawn PNG trees without background in our Open ArchiVIZ Pack. The pack is absolutely free and can be used for private AND commercial!

- Import the hand drawn .png trees in Photoshop
- For the trees to be seen from the windows, place it over the window punch.
- Go to the basic section layer and select the punch area through Magic Wand
- Right click and select inverse .
- Now go back to the tree layer and erase the unexpected twigs and trunks. Simple!
- Add trees to the surrounding too.
- Work on the opacity and sizes . The trees in the front are sharper and bigger while those overcrowding the background tend to be shorter, less visible. Many trees with varied opacity create three-dimensional visual pleasure.
Add Translucent Texture
- Select a window from the basic section drawing layer by Magic Wand . Then create a new layer. Name it “window 1“.
- Select Brush tool , choose a brush. I prefer brush no. 100 in a size of 133 px.
- Select the color. For colored section, I like any lighter shade of cyan.
- Customize the opacity of the brush as 9-10%
- Now, sketch the texture. It will be a lot easier if you work in a graphic pad but trust me, even a little bit of practice makes your mouse-hand perfect, too.
- Do the waters in the same Just add strokes of other colors to give a greater depth.
- Precaution: don’t overdo the strokes for the glass. Keep it simple.

Adding a Background Sky Image to Architecture Drawing
(Architecture) sky images that can be merged with your architectural rendering are important. I need them quite often and nearly always add them in Photoshop in the post processing. You can fairly easy test different sky types (clouds, sunset etc.) and also more important change the saturation and brightness on the fly. Always remember that the sky image is a quite prominent part of your architectural illustration at the end and stands for emotions. For this example I use an abstract sky background from the Open ArchiVIZ Pack:

I really like this one because it comes along with different looks in its super wide format of 5000 px. And the clouds are not that dominant so it is really perfect for architecture visualization. To merge it with your scenery do the following steps:
- Create a new layer. Keep it under all the layers.
- Open the sky background image.
- Play around with the scaling and location – so which part of the image is visible in your canvas.
- I reduced saturation and increased brightness a bit.

Adding Shadows in Photoshop
- Select the interior rooms one by one. (You know how!)
- Add new layer.
- Sketch the shadows using the brush tool . Keep the areas near the openings light and stroke down the darker ones. Work in multiple shades of gray.
- Keep each room in each layer. It will help a lot in future.
Adding Persons Silhouettes to the Section

- Add human beings. Scale them down – Where do you get these for free? Yes you might already have an idea: Open ArchiVIZ Pack or download our small set of Photoshop People Silhouettes here!
- Add birds to the sky – I used our free flying birds PNG with transparent background graphic pack download for this
- Create hierarchy. Play with the opacity and sizes. Usually, total opaque human figures break the attention over unnecessary details. Keep the opacity medium to low in order to focus on the designed spaces.
Final Architecture Section Drawing – Pimped!
Now, your sectional drawing it totally ready to convince everyone!

Does it look like a tedious line drawing? Surely not! The more you practice; the quality of your brushstrokes will improve and take a lot less time. As mentioned we used a quite simple design here to go with you through the steps but we hope that you can use the workflow ideas to create an awsesome architectural section drawings with a simple Sketchup Model in your next project within a limited time frame as well!
If you liked this Sketchup tutorial make sure to check out our tutorial how to use Sketchup Tree Components to bring life to your architecture scenery with ease as well!
So from now on you don’t produce building sections, create artworks!
If you liked this article you will love these related articles:

Reader Interactions
Leave a reply cancel reply.
Your email address will not be published. Required fields are marked *
By using this form you agree with the storage and handling of your data by this website. *
This site uses Akismet to reduce spam. Learn how your comment data is processed .
10 Tips on using Photoshop for presentation

You know the struggle: you have to create a visually engaging presentation using PowerPoint . Yet, the look and feel of the presentation simply aren’t professional enough. Enter Adobe Photoshop. Traditionally a tool associated with image manipulation and editing, Photoshop might not be at the top of your list when it comes to tools for creating refreshing presentations. However, the vast variety of graphic design tools the software offers makes it an incredible complement to software like Powerpoint and Slides. Unsure about where to start? Keep reading this article for ten top tips on using Adobe Photoshop for your presentations.

1: Make Sure Your Scale is Consistent

The key issue when creating graphics for Powerpoints in Photoshop is the scaling of the graphics themselves. If one is formatted differently than the other, then transferring your graphics from one platform to another goes from being a success to a disaster. Before you begin, make sure to match your Photoshop canvas size to the Powerpoint slide size. And remember – Photoshop uses pixels while Powerpoint uses inches, so make sure to convert the dimensions when you’re adjusting your Photoshop canvas!
2: Less is More!

If you are designing graphics for a text-based presentation, make sure to not let your graphics stand out. While graphic design is vital to a great presentation, it is only meant to focus a viewer’s eye on the points being made – not take away from the point by being overtly eye-catching.
3: Still… Don’t be Afraid to be Bold!

Even though your focus should be to allow the text on your slides to speak to a viewer, don’t be afraid to use the graphic design tools of photoshop to take your presentation to the next level. After all, you wouldn’t be using Photoshop for your presentation if you simply wanted a run-of-the-mill presentation!
4: Use Adobe Colour

One of the first steps in building beautiful graphics for a presentation is finding a colour palette that suits the tone and graphics of the presentation that is visually appealing. To help you in this quest, use another tool in the Adobe suite of products – Adobe Colour – to help you create the colour palette that will truly match your presentation. Adobe Colour has a contrast checker that helps you make sure your text colour will be readable against your background colour for maximum impact. It also helps you make sure your colour choices adhere to the Web Content Accessibility Guidelines (WCAG) so that your presentation is truly accessible to everyone on the internet.
5: Make the Best of Both Worlds

While Adobe Photoshop remains the premier tool for graphic design, it lacks movement-based effects that can also be incredibly important to a powerful presentation. However, even the less advanced tools of Powerpoint can be a blessing on this front! Use Photoshop to create graphic objects to layer above your background graphics, and use Powerpoint to animate them in your presentation to add a new dimension to your slides (both literally and metaphorically).
6: Use Photoshop’s In-house PDF Slideshow Feature for High Quality Renders You Can Easily Share

When sharing your graphics with clients, don’t hesitate to use Photoshop’s in-house high-quality rendering capabilities. By using the software’s PDF download function (rather than downloading your PowerPoint as a PDF or PPT) you enable the viewer to gain the best possible viewing experience across multiple kinds of devices.
7: Use Adobe Cloud Sharing for Easy Collaboration

No matter how confident we are in our skills, we sometimes need some help. For assistance from your colleagues, use Adobe’s cloud sharing capabilities to share your graphics with other people. This prevents you from constantly saving high-memory renders of your graphics to send to your colleagues and allows them to add suggestions and make changes to your document directly, saving all of your important time.
8: Use Adobe’s Cross-device Synchronisation of Platforms to Your Advantage

As convenient as a trackpad or mouse can be for a skilled graphic designer, sometimes a pen and paper are simply best. In these moments, use Adobe Photoshop’s unique ability to save designs across devices to access graphic designs you created on your computer on a tablet, where you can use a stylus to make the adjustments that take your graphics to the next level.
9: College Students – Use Your College Student Discount or Your School’s Photoshop Licence

The tips in this article apply to presentations in the workplace – but why not get started earlier in your career? If you are a student struggling to make interesting presentations for your classes and are looking for a way to upskill yourself, try and learn photoshop! This is made even easier by most colleges buying licences for use of photoshop that you can access for free. Don’t hesitate in getting started!
10: The Devil is in the Details

At the end of the day, Powerpoint already has its own graphic design capabilities – so make sure your use of Photoshop is worth it. Take the effort to make every small detail in your graphics valuable, and it will clearly show in the quality of your presentation.
Childress, A., 2019. How to Make PowerPoint Slide Backgrounds In Photoshop (PPT Size/Format?) . [online] Envato Tuts+. Available at: <https://business.tutsplus.com/tutorials/make-powerpoint-backgrounds-in-photoshop–cms-34122> [Accessed 7 August 2022].
Color.adobe.com. n.d. Adobe Color . [online] Available at: <https://color.adobe.com/create/color-contrast-analyzer> [Accessed 7 August 2022].

Aaditya Bhasker he is an undergraduate student of Architecture and Urban-Studies at Haverford College. He hopes to channel his passion for architecture into social justice work surrounding housing reform in India. Outside academia, they also enjoy watching movies, reading, and hiking with their dog in Hong Kong, where they currently lives

Timeline of restoration: Antwerp Port House

Jeff Koons-10 Iconic Artworks
Related posts.

Building Brands: Nike

Innovative Waste Management Solutions for Construction Sites

Role of Social Welfare in Business

Creative Techniques in Museum Design: Merging Functionality with User Experience

The Intersection of Spirituality and Geometry in Asian Sacred Spaces: A Comparative Study of Mandalas, Vastu Shastra, and Feng Shui

Inclusive Innovation: Design for All
- Architectural Community
- Architectural Facts
- RTF Architectural Reviews
- Architectural styles
- City and Architecture
- Fun & Architecture
- History of Architecture
- Design Studio Portfolios
- Designing for typologies
- RTF Design Inspiration
- Architecture News
- Career Advice
- Case Studies
- Construction & Materials
- Covid and Architecture
- Interior Design
- Know Your Architects
- Landscape Architecture
- Materials & Construction
- Product Design
- RTF Fresh Perspectives
- Sustainable Architecture
- Top Architects
- Travel and Architecture
- Rethinking The Future Awards 2022
- RTF Awards 2021 | Results
- GADA 2021 | Results
- RTF Awards 2020 | Results
- ACD Awards 2020 | Results
- GADA 2019 | Results
- ACD Awards 2018 | Results
- GADA 2018 | Results
- RTF Awards 2017 | Results
- RTF Sustainability Awards 2017 | Results
- RTF Sustainability Awards 2016 | Results
- RTF Sustainability Awards 2015 | Results
- RTF Awards 2014 | Results
- RTF Architectural Visualization Competition 2020 – Results
- Architectural Photography Competition 2020 – Results
- Designer’s Days of Quarantine Contest – Results
- Urban Sketching Competition May 2020 – Results
- RTF Essay Writing Competition April 2020 – Results
- Architectural Photography Competition 2019 – Finalists
- The Ultimate Thesis Guide
- Introduction to Landscape Architecture
- Perfect Guide to Architecting Your Career
- How to Design Architecture Portfolio
- How to Design Streets
- Introduction to Urban Design
- Introduction to Product Design
- Complete Guide to Dissertation Writing
- Introduction to Skyscraper Design
- Educational
- Hospitality
- Institutional
- Office Buildings
- Public Building
- Residential
- Sports & Recreation
- Temporary Structure
- Commercial Interior Design
- Corporate Interior Design
- Healthcare Interior Design
- Hospitality Interior Design
- Residential Interior Design
- Sustainability
- Transportation
- Urban Design
- Host your Course with RTF
- Architectural Writing Training Programme | WFH
- Editorial Internship | In-office
- Graphic Design Internship
- Research Internship | WFH
- Research Internship | New Delhi
- RTF | About RTF
- Submit Your Story
IMAGES
VIDEO
COMMENTS
The easiest way to render a section in photoshop for beginners, All the files used in the tutorial are given below. If you like the video, please give a like...
Today's video is a section rendering in photoshop for architects and architecture Tutorial - Narrated step by step tutorial in photoshop cc 2019 for architec...
Today's video is Section Architecture Rendering with Photoshop / Architectural Visualization, how to add cutout people, architectural trees and context in se...
This two-part series shows how to build out a landscape section entirely on photoshop. The first video focuses on a basic 2D section with a water body, vegetation and human activity. This is a method that focuses less on accurate site contours and more on the visual impact of the site. However, it is easy to start with a contour diagram from an ...
Once you have a plan, section, perspective or other drawing you can start to render them in Photoshop. In CAD and Revit you can print a pdf to scale, then import it into Photoshop to keep the scale accurate. Double check to make sure it looks to scale when you import it to be sure. I have yet to figure out how to get Sketchup to export to scale.
General Tips. 7) Minimize text on your presentation board. Write a short and concise concept statement and add a very brief explanation, if needed. Don't waste your time composing elongated descriptive text because no one will read it. 8) Replace words, whenever possible, with simple illustrative sketches and figures.
Photoshop Sections. Section Architecture Rendering with Photoshop / Architectural Visualization. 05/02/2019. Today's video is Section Architecture Rendering with Photoshop / Architectural Visualization, how to add cutout people, architectural trees and context in sections. ***** ***** Products mentioned: Art Maker Drawing Masterclass Kit ...
Scaling: This video doesn't explain scaling, but typically, I would also export the SU section into CAD. From there, I would plot the file as a PDF to a predetermined scale then open the PDF file in Photoshop. I would then resize the rendered section to the size of the CAD PDF. Line work: In the video, the section is poched in Photoshop.
The following video shows the work-flow and Photoshop methods used to create a quick section in Photoshop from a section created in Sketchup. Similarly, you can also use CAD to create your section and finish it using the same Photoshop methods in Photoshop. Using CAD you can keep your drawings to scale. To learn more about section rendering in ...
For the first style I will go turn of the edges, put the section fill in white, section lines in white as well and the background in white. Now lets turn on the shadows adjust the shadows and save it as a scene. For the second scene put the background in black, turn off the shadows, and call this object shadows. And save it as a scene.
All the files are here- https://drive.google.com/drive/folders/1shZhhDIcSkwjv8-dt5RuqrZ6HhAuucln?usp=sharing Alternative Download-PEOPLE CUTOUT-http://www.m...
Photoshop has long established as a top-notch instrument for architects involved in different creative spheres. I have prepared some tips on Photoshop architecture rendering, which you can use to make the process streamlined and resultative. 1. Keep Your Layers Organized. Though it is easier to work with a smaller number of layers, the ...
"Tutorials for Post Production Editing of Architecture Drawings in Photoshop" [10 Tutoriales de postproducción en Photoshop para la representación de arquitectura] 29 Jun 2018. ArchDaily . (Trans.
Create a Architecture Section View. Click the Camera button and check Parallel Projection ; Click the view you want. (Front, rear, up or down; from where the generated section is visible. Select File<Export<2D Graphic; Save it as a .jpeg; Now you'll get a shot of your section. Just keep in mind to zoom in for a maximum visualization.
PHOTOSHOP PRESENTATION(Elevation& Section) Salsabel Mohamed. 9 42. Save. Section in Isometric View with Photoshop (Youtube) Oliver Uszkurat. 48 3.2k. Save. section rendering in photoshop. Esraa Elmeshad. 6 28. Save. Magazine İnterview Section. Marat Elbeyoğlu. 1 3. Save. Isometric Section. Nazanin Aghababaie. 1 11.
2: Less is More! If you are designing graphics for a text-based presentation, make sure to not let your graphics stand out. While graphic design is vital to a great presentation, it is only meant to focus a viewer's eye on the points being made - not take away from the point by being overtly eye-catching. 3: Still….
Photoshop Architecture Section Render : How to Render Architecture Section in 5 Steps using 5 Basic Photoshop Commands!It is very easy and fast architecture ...
Sep 12, 2018 - Examples of using photoshop to enhance hand drawn or simple line section drawings. See more ideas about architectural section, architecture drawing, architecture presentation.
Hello friends! On this video we will go over a quick workflow of exporting a section render from enscape, combining it with a Cad drawing and tweaking things...
Architecture,Visualization,Architecture Concept,3D Studio Max,Corona Renderer,Adobe Photoshop
This video explains how to create a presentation in photoshop. #adjotech #photoshop #presentation Subscribe to my channel here: https://bit.ly/3h4BPBFGET IN...